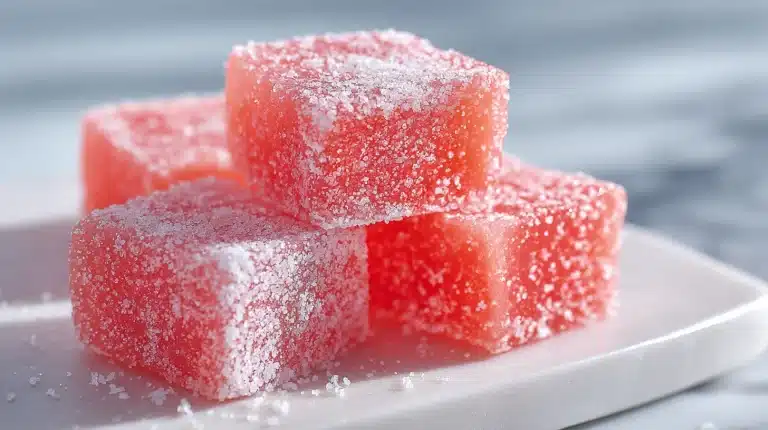
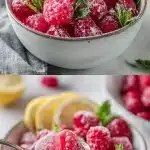
Raspberry lemonade electrolyte gummies might be the most genuinely useful thing you can make in a silicone mold, and somehow nobody talks about them the way they deserve.
 19")
Most sports snacks taste like a chemistry lab dissolved in fruit punch, and the store-bought gummy options are packed with artificial dyes, excess sugar, and a price tag that stings more than a hard workout.
You’ll walk away with the exact blooming technique for both gelatin and agar agar, a ratio that produces a firm, bouncy chew (not a sad, wobbly blob), and a smart electrolyte powder trick that keeps every batch tasting bright and tart.
Table of Contents
Why These Homemade Electrolyte Gummies Actually Work
There’s a reason sports nutritionists have been quietly excited about gummy-format electrolytes for years. When you deliver sodium, potassium, and magnesium through a chewable, portion-controlled format, your body absorbs them at a steady pace rather than all at once. That means no stomach sloshing mid-run and no salt overload that makes you feel worse than before you drank anything.
The Science Behind the Chew
Commercial electrolyte gummies are almost always built on a base of corn syrup and a walloping dose of artificial color. The electrolytes are real, but the surrounding ingredients undercut the benefit. When you make homemade electrolyte gummies from scratch, you control every variable.
Here’s what actually matters in the formula:
- Raspberry juice brings natural potassium and antioxidants, plus that deep berry flavor that pairs so well with citrus.
- Lemon juice adds vitamin C and a bright tartness that balances the sweetness without added sugar.
- Electrolyte powder is non-negotiable. Look for a clean-label version with sodium, potassium, and magnesium, and no sucralose aftertaste.
- Maple syrup (or a keto-friendly sweetener like monk fruit) rounds out the flavor without pushing the sugar count sky-high.
- Agar agar powder or unflavored gelatin is your setting agent, and the choice between them changes the texture in ways worth understanding.
Agar Agar vs. Gelatin: Which Should You Use?
This is the question I get most often about DIY electrolyte gummies, so let’s settle it properly.
Agar agar is a plant-based setting agent derived from red algae. It sets firmer and faster than gelatin, holds at room temperature longer, and makes these completely vegan electrolyte gummies. The texture is slightly more snappy than gelatin, almost like a firm jelly candy.
Gelatin, on the other hand, is derived from animal collagen and produces a softer, more elastic chew. It’s the texture you recognize from classic gummy bears. Gelatin also has the bonus of being gut-friendly, with collagen peptides that support digestion.
My recommendation: go with agar agar if you want a shelf-stable, plant-based gummy. Choose gelatin if you prefer a softer bite and aren’t concerned about keeping things vegan. The recipe below includes instructions for both, so you can pick your path.
If you enjoy experimenting with agar agar in sweet recipes, you might also love this gelatin ice cream recipe for another unexpected way to use setting agents.
Print 18")
Raspberry Lemonade Electrolyte Gummies (Vegan + Sugar-Free Option)
- Total Time: 83 min
- Yield: 40 gummies 1x
- Diet: Vegan
Description
These homemade raspberry lemonade electrolyte gummies are made with real raspberry juice, fresh lemon juice, and a clean electrolyte powder. They set up firm and chewy using agar agar for a vegan version or gelatin for a classic soft bite. Each small gummy delivers a balanced hit of sodium, potassium, and magnesium without artificial dyes or excess sugar.
Ingredients
For the raspberry lemonade base:
1 cup (240 ml) raspberry juice (100% juice, no added sugar)
3 tablespoons fresh lemon juice (about 1.5 medium lemons)
2 tablespoons maple syrup (or 1 tablespoon monk fruit sweetener for sugar-free)
1 packet (5 g) unflavored or lightly flavored electrolyte powder
1 pinch fine sea salt
For the vegan version (agar agar):
2 teaspoons agar agar powder (not flakes)
For the classic gelatin version:
2 packets (14 g total) unflavored gelatin powder
3 tablespoons cold water (for blooming gelatin only)
Instructions
1. Bloom the gelatin (gelatin version only): Sprinkle the gelatin powder over 3 tablespoons of cold water in a small saucepan. Let it sit undisturbed for 5 minutes until it puffs into a spongy mass. Skip this step if using agar agar.
2. Combine the base: Add raspberry juice, lemon juice, maple syrup, electrolyte powder, and sea salt to the saucepan. If using agar agar, add the powder directly to the juice now.
3. Heat the mixture: Warm the saucepan over medium-low heat, whisking gently. For agar agar, bring to a gentle simmer and cook for 2 full minutes, whisking constantly, until the powder fully dissolves. For gelatin, heat until the bloomed gelatin melts completely into the liquid, about 3 minutes. The mixture will turn a deep cranberry-red and smell of fresh berries and bright citrus. Do not let it boil hard.
4. Cool briefly: Remove from heat and let the mixture rest for 2 minutes. It should still be fully liquid but no longer steaming aggressively.
5. Fill the molds: Pour the mixture into a measuring cup with a spout. Use a dropper or small turkey baster to fill each silicone mold cavity about 90% full. Work quickly, especially with agar agar, which begins to set around 95 degrees F.
6. Refrigerate to set: Place the filled molds on a flat surface in the refrigerator for at least 60 minutes, until the gummies are firm and release cleanly from the mold.
7. Unmold and serve: Press gently on the bottom of each mold cavity and pop the gummies out. If any stick, place the mold in the freezer for 30 seconds and try again. The finished gummies should be glossy, bouncy, and jewel-bright.
Notes
Store in an airtight container in the refrigerator for up to 7 days (agar agar) or 5 days (gelatin). Freeze for up to 2 months in a zip-seal bag and thaw overnight in the fridge.
For a sugar-free batch, omit the maple syrup entirely or use powdered monk fruit sweetener to taste. The electrolyte powder adds subtle sweetness on its own.
If using fresh raspberries instead of juice, blend 1.5 cups of raspberries and strain through a fine mesh sieve to yield about 1 cup of smooth juice. This produces a richer color and more intense berry flavor.
Agar agar flakes require about 3 times the amount of agar agar powder, so always use powder for accurate results. Agar agar sets faster and firmer than gelatin and holds at room temperature longer.
- Prep Time: 13 min
- Rest Time: 60 min
- Cook Time: 10 min
- Category: Snack
- Method: Stovetop
- Cuisine: American
Nutrition
- Serving Size: 4 gummies
- Calories: 18 kcal
- Sugar: 3 g
- Sodium: 120 mg
- Fat: 0 g
- Saturated Fat: 0 g
- Unsaturated Fat: 0 g
- Trans Fat: 0 g
- Carbohydrates: 4 g
- Fiber: 0 g
- Protein: 0 g
- Cholesterol: 0 mg
Ingredients You Need and Why Each One Earns Its Place
Getting the ingredient list right is half the battle with homemade gummies. Too little setting agent and you get puddles. Too much and you’re chewing through something closer to a rubber eraser. Here’s the full breakdown with quantities and the reasoning behind each choice.
For the Raspberry Lemonade Base
- 1 cup (240 ml) raspberry juice (100% juice, no added sugar, or strained fresh raspberry puree)
- 3 tablespoons fresh lemon juice (about 1.5 medium lemons)
- 2 tablespoons maple syrup, or 1 tablespoon monk fruit sweetener for sugar-free electrolyte gummies
- 1 packet (about 5 g) clean-label electrolyte powder (unflavored or lightly flavored)
- 1 pinch of fine sea salt (boosts the sodium content and brightens flavor)
For the Setting Agent (Choose One)
Vegan version:
- 2 teaspoons agar agar powder (not flakes, which require a different measurement)
Classic gelatin version:
- 2.5 tablespoons unflavored gelatin powder (one standard Knox packet is about 7 g, so you’ll use approximately 2 packets)
- 3 tablespoons cold water (to bloom the gelatin)
Equipment
- Silicone molds (bear-shaped, cube, or any small cavity mold, aim for roughly 40 cavities total)
- A small saucepan
- A measuring cup with a pour spout (crucial for clean fills)
- A dropper or small turkey baster for precision filling
One note on raspberry juice: if you want the deepest berry flavor and color, use a juice with no added water. The more concentrated the raspberry, the more vivid your finished gummies. If all you have is a juice cocktail blend, reduce it gently on the stove for five minutes first to concentrate it slightly.
For another delicious way to use raspberry and lemon together, check out this raspberry lemon sourdough bread on the site. The flavor pairing is truly one of the best in the fruit world.
Step-by-Step Instructions for Perfect Gummies Every Time
The process is genuinely simple, but three specific moments can trip you up if you’re not paying attention. I’ll flag each one as we go.
Step 1: Bloom Your Setting Agent
For gelatin: Sprinkle the gelatin powder over 3 tablespoons of cold water in your saucepan. Let it sit for exactly 5 minutes without stirring. It will puff up into a wrinkled, spongy mass. This is correct. Do not skip this step. Unbloomed gelatin added to hot liquid produces grainy, uneven gummies that never quite set right.
For agar agar: No blooming needed. Simply combine the agar agar powder with the raspberry juice directly in the saucepan. Agar agar needs to be simmered to activate, so cold blooming isn’t part of the process.
Step 2: Combine and Heat the Liquid
Add the raspberry juice, lemon juice, maple syrup, electrolyte powder, and sea salt to the saucepan. If you’re using agar agar, it’s already in there.
Heat over medium-low heat, whisking gently, until the mixture just reaches a gentle simmer. You’ll see small bubbles forming around the edges and the mixture will turn a gorgeous deep cranberry-red, fragrant with berry and bright citrus. For agar agar, simmer for 2 full minutes while whisking to ensure it fully dissolves. For gelatin, simply warm until the bloomed gelatin melts completely into the liquid, about 3 minutes. Do not boil either version hard, as high heat can weaken the setting power.
Step 3: Fill the Molds
Remove the saucepan from heat and let the mixture cool for 2 minutes. This is important: pouring boiling liquid into silicone molds can warp them and causes the gummies to shrink as they cool. Two minutes brings the temperature down just enough.
Pour into a measuring cup with a spout, then use a dropper to fill each mold cavity about 90% full. Work quickly, especially with agar agar, which begins setting around 95°F (35°C) and can gel in the pan if you dawdle.
Step 4: Set and Unmold
Place the filled molds on a flat surface in the refrigerator for at least 60 minutes. For agar agar gummies, you’ll notice they actually firm up on the counter in about 20 minutes, but a refrigerator chill gives them the cleanest snap and the longest texture life.
Once set, press gently from the bottom of each mold cavity and pop the gummies out. They should release cleanly. If any stick, a brief 30-second stint in the freezer helps them firm up enough to release without tearing.
The finished raspberry lemonade electrolyte gummies should be firm, glossy, and jewel-bright. If you want a fun sour version with a similar vibe, take a look at this sour watermelon gummies recipe for comparison on technique.
Customizing, Storing, and Getting the Most Out of Every Batch
One of the best things about making homemade electrolyte gummies is how easy they are to adapt. Once you have the core ratio down, the flavor and function options open up considerably.
Flavor and Sweetener Swaps
- No maple syrup on hand? Raw honey works beautifully in the gelatin version. For the vegan agar agar version, stick to liquid sweeteners or powdered monk fruit, since honey can affect agar’s setting ability at high concentrations.
- Want more tartness? Add an extra tablespoon of lemon juice and reduce the raspberry juice by the same amount. The citric acid in fresh lemon juice also acts as a natural preservative.
- Want it sugar-free? Simply skip the maple syrup entirely or use a measured packet of monk fruit sweetener. The electrolyte powder often contributes a subtle sweetness on its own.
- Want more electrolytes per gummy? Use a serving of electrolyte powder that’s rated for 16 oz of water (rather than 8 oz) across the batch. This roughly doubles the sodium, potassium, and magnesium per piece without changing the flavor dramatically.
How to Store Your Gummies
Storage is straightforward but worth doing right:
- Refrigerator: Store in an airtight container for up to 7 days. Gelatin gummies are best within 5 days. Agar agar gummies hold slightly longer due to their plant-based structure.
- Freezer: You can freeze these for up to 2 months in a zip-seal bag. Thaw in the fridge overnight. Texture is slightly softer after freezing but still enjoyable.
- Counter (agar agar only): If kept cool and dry, agar agar gummies can sit at room temperature for up to 2 days. Gelatin gummies should always stay refrigerated.
Post-Workout Serving Ideas
These raspberry lemonade electrolyte gummies shine brightest as a post-workout snack, but don’t stop there. A small handful before a long hike, tucked into a child’s lunchbox on a hot afternoon, or served alongside a sparkling water as a low-sugar afternoon treat all make perfect sense. The portion naturally controls itself because each gummy contains just a fraction of an electrolyte serving. Eat 4 to 6 and you’re in a great spot without overdoing it.
If you’re interested in other hydration-focused recipes, the bariatric lemon drink recipe is a great companion for days when you want liquid hydration instead.
Frequently Asked Questions
Can I use gelatin instead of agar agar?
Yes, absolutely. Use 2 packets of unflavored gelatin powder (about 14 g total) bloomed in 3 tablespoons of cold water before adding it to the warm juice mixture. The texture will be softer and more elastic than agar agar, similar to a classic gummy bear. Gelatin also adds a small amount of protein and collagen, which is a bonus for recovery.
How long do homemade gummies last?
Gelatin-based gummies stay fresh in an airtight container in the refrigerator for up to 5 days. Agar agar gummies last up to 7 days refrigerated and can even hold at room temperature for a day or two in a cool, dry spot. Freeze either version for up to 2 months. Always use a clean, dry spoon when serving to avoid introducing moisture that speeds up breakdown.
Can I use fresh raspberries instead of juice?
Yes, with one extra step. Blend about 1.5 cups of fresh or frozen raspberries, then strain through a fine mesh sieve to remove seeds. You should get roughly 1 cup of smooth raspberry puree that works exactly like juice in this recipe. The flavor is even more intense and the color is a deeper, richer red when you use fresh fruit. Just make sure to strain thoroughly, since seeds can make the texture gritty.
Do electrolyte gummies actually work?
They work when the electrolyte powder inside them is a quality formula with meaningful amounts of sodium (at least 100 mg per serving), potassium, and magnesium. The gummy format slows absorption slightly compared to a liquid drink, which some people find easier on the stomach during or after exercise. Think of them as a convenient, portion-controlled way to replenish minerals, not a replacement for drinking enough water alongside them.
Conclusion
Making raspberry lemonade electrolyte gummies at home takes less than 15 minutes of active effort and delivers a snack that genuinely does something for your body while tasting like a summer afternoon.
We started with a frustration (overpriced, over-sugared store options) and landed on a clean, flexible recipe that works for vegan eaters, keto followers, and anyone who just wants to know what’s actually in their food. Give this a try before your next workout or batch it on Sunday for the whole week ahead.
For more recipes like raspberry lemonade electrolyte gummies, follow us on Facebook and Pinterest for healthy homemade snack ideas.