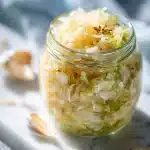
My grandmother kept a crock of this homemade sauerkraut recipe going on her back porch every single autumn, and the sharp, clean tang of it still stops me cold whenever I smell it fermenting on my own counter today.

Most people assume fermented food is complicated, finicky, or requires special equipment. It doesn’t. This recipe needs exactly two ingredients and a mason jar you already own.
Coming up: how to massage cabbage correctly so it releases enough brine, how to tell when fermentation is actually working, and the exact salt ratio that keeps things safe and crunchy.
Table of Contents
What Is Sauerkraut and Why Make It at Home
The Simple Science Behind the Tang
Sauerkraut is one of the oldest preserved foods on the planet. The word is German for “sour cabbage,” and the process behind it is called lacto-fermentation. Naturally occurring bacteria called Lactobacillus live on the surface of every fresh cabbage leaf. When you add salt and pack the cabbage tightly under its own brine, you create an oxygen-free environment where those bacteria thrive, producing lactic acid that preserves the cabbage and gives it that sharp, pleasantly sour flavor.
What you end up with is completely different from the sodium-loaded, pasteurized, vinegar-brined sauerkraut sold in most grocery store cans. That store-bought version is shelf-stable because it has been heated, which kills the beneficial bacteria entirely. A true lacto-fermented sauerkraut is alive with probiotics, and the flavor is brighter, more complex, and far less one-dimensional.
Why Homemade Beats Store-Bought Every Time
When you make sauerkraut at home, you control every variable: the salt level, the fermentation time, the texture, and even the add-ins. A longer ferment gives you a more sour, deeply flavored kraut. A shorter ferment gives you something milder and still slightly crisp, almost like a quick pickle with extra depth. Store-bought gives you no such choice.
There’s also the cost factor. A small head of green cabbage costs less than two dollars at most supermarkets and produces a full quart jar of sauerkraut. The equivalent volume of quality refrigerated sauerkraut at a grocery store often runs five dollars or more.
Beyond flavor and budget, the health case is real. Live-culture sauerkraut is rich in Lactobacillus bacteria, vitamin C, and vitamin K. Fermentation also partially breaks down the cabbage’s cell walls, making the nutrients more bioavailable than in raw or cooked cabbage.
If you enjoy fermented vegetables, you might also want to try a fermented carrots recipe once you have this technique down. The core method is nearly identical, and the results are just as satisfying.
Making your own is also genuinely satisfying in a quiet, almost meditative way. You shred, you salt, you squeeze, and then you wait. Time does most of the work. The payoff is a jar of something genuinely alive that you made from scratch with your own hands.
Print
Homemade Sauerkraut Recipe: How to Make Tangy Fermented Cabbage from Scratch
- Total Time: 10100 min
- Yield: 8 servings 1x
- Diet: Vegan
Description
A classic two-ingredient fermented cabbage made with shredded green cabbage and non-iodized salt. The cabbage ferments at room temperature in its own brine to produce a crunchy, tangy sauerkraut packed with live cultures. No vinegar, no canning, and no special equipment required.
Ingredients
For the sauerkraut:
2 lbs green cabbage (1 medium head, outer leaves reserved)
2 teaspoons fine sea salt or kosher salt (non-iodized)
Optional add-ins:
1 teaspoon caraway seeds
4 juniper berries (lightly crushed)
2 garlic cloves (smashed)
Instructions
1. Remove the outer 2 to 3 leaves from the cabbage and set one large leaf aside. Quarter the cabbage, cut out and discard the core, then slice each quarter into thin ribbons about 1/8 inch thick.
2. Transfer the shredded cabbage to a large mixing bowl and sprinkle the sea salt evenly over the top. If using caraway seeds, juniper berries, or garlic, add them now.
3. Using clean hands, firmly massage and squeeze the cabbage for 5 to 10 minutes until it softens and releases a noticeable pool of clear brine at the bottom of the bowl. The cabbage should smell fresh and clean.
4. Pack the cabbage into a clean wide-mouth quart mason jar in small handfuls, pressing each layer down firmly with your fist or a wooden spoon to eliminate air pockets. The brine should rise above the cabbage surface as you pack.
5. Lay the reserved whole cabbage leaf over the shredded cabbage, tucking the edges against the jar sides. Place a small jar filled with water on top of the leaf to keep the cabbage submerged below the brine.
6. Cover the jar opening with a clean cloth or coffee filter and secure it with a rubber band. Leave the jar at room temperature between 65 degrees F and 75 degrees F, away from direct sunlight.
7. Check the jar daily. Press the cabbage down if any shreds float above the brine. Within 24 to 48 hours you should see small bubbles forming along the sides of the jar, which means fermentation is active.
8. Taste the sauerkraut starting on day 5. For a mild, lightly sour flavor, ferment for 5 to 7 days. For a deeply sour, traditionally tangy German-style kraut, continue fermenting for up to 4 weeks.
9. Once the sauerkraut reaches the flavor you want, remove the weight and the cabbage leaf lid, seal the jar with a regular mason jar lid, and transfer it to the refrigerator to stop fermentation.
Notes
Store sealed in the refrigerator for up to 6 months. The flavor will continue to develop very slowly in the fridge. Do not freeze if you want to preserve the live probiotic cultures.
Always use non-iodized salt. Iodized table salt can inhibit the fermentation bacteria and produce a mushy or off-flavored result.
If the cabbage does not release enough brine after massaging, dissolve 1 teaspoon of non-iodized salt in 1 cup of filtered water and pour just enough over the packed cabbage to submerge it fully.
A cloudy brine and a sour, tangy smell are signs of healthy fermentation. Skim off any white kahm yeast film that forms on the brine surface, but do not discard the batch unless you see pink, black, or fuzzy mold growing below the brine line.
- Prep Time: 20 min
- Rest Time: 10080 min
- Category: Side Dish
- Method: No-Cook
- Cuisine: German
Nutrition
- Serving Size: 1/4 cup
- Calories: 20 kcal
- Sugar: 2 g
- Sodium: 320 mg
- Fat: 0 g
- Saturated Fat: 0 g
- Unsaturated Fat: 0 g
- Trans Fat: 0 g
- Carbohydrates: 4 g
- Fiber: 2 g
- Protein: 1 g
- Cholesterol: 0 mg
Ingredients and Equipment You Need
Two Ingredients, One Ratio to Remember
The beauty of this recipe is its near-total simplicity. You need:
- 1 medium head of green cabbage (about 2 pounds)
- 1 teaspoon of non-iodized salt per pound of cabbage (about 2 teaspoons total)
That is the whole ingredient list. The salt-to-cabbage ratio is the only number you need to memorize: roughly 2% salt by weight. If you have a kitchen scale, weigh your shredded cabbage in grams and multiply by 0.02 to get the exact grams of salt needed. If you are working by volume and intuition, 1 teaspoon of fine sea salt per pound of cabbage works reliably every time.
One critical note on salt: use kosher salt, fine sea salt, or pickling salt. Iodized table salt contains iodine and anti-caking agents that interfere with fermentation bacteria and produce a mushy, off-flavored result. It’s the single most common mistake, and it’s completely avoidable.
Equipment List
You don’t need to buy anything special. Here’s what you need:
- A sharp chef’s knife or a mandoline slicer
- A large mixing bowl
- A clean quart-size wide-mouth mason jar
- A smaller jar or zip-lock bag filled with water (to weigh the cabbage down)
- A clean cloth or coffee filter secured with a rubber band
Optional but helpful:
- A kitchen scale for precise salt measurement
- A kraut pounder or a sturdy wooden spoon for packing
The wide-mouth mason jar is important because it lets you pack the cabbage tightly and reach your hand or a spoon inside easily. Standard-mouth jars work but can make packing awkward.
Step-by-Step: How to Make Sauerkraut at Home
Step 1: Prepare the Cabbage
Remove the outermost two or three leaves from your cabbage and set one of them aside. You’ll use it later as a lid inside the jar to hold the shredded cabbage below the brine. Quarter the cabbage, cut out the core, and slice each quarter into thin ribbons, about 1/8 inch thick. A mandoline makes this fast and consistent, but a sharp knife works just as well with a little patience.
Transfer the shredded cabbage to a large bowl and sprinkle the salt evenly over the top.
Step 2: Massage Until Brine Appears
This is the step that makes or breaks this recipe: the massage. Using clean hands, squeeze, press, and knead the salted cabbage firmly for 5 to 10 minutes. You’ll feel it soften almost immediately. Within a few minutes, the cabbage releases a significant amount of liquid, and the bowl begins to pool with a cloudy brine.
You’re looking for enough brine to fully submerge the cabbage once it’s packed into the jar. If after 10 minutes the cabbage still seems dry, let it rest for another 10 minutes and come back to it. The salt continues drawing out moisture even when you stop massaging.
Step 3: Pack the Jar
Transfer the cabbage and all of the brine into your quart jar in small handfuls, pressing each addition firmly downward with your fist or a spoon so that air pockets are eliminated and the brine rises above the cabbage. By the time the jar is full, the brine should be sitting at least half an inch above the surface of the cabbage.
Lay the reserved cabbage leaf over the top of the shredded cabbage, tucking the edges down against the sides of the jar. This acts as a physical barrier to keep any stray shreds from floating up into the headspace above the brine. Place your small weight jar on top of the leaf to hold everything submerged.
Step 4: Ferment at Room Temperature
Cover the jar loosely with a cloth or coffee filter secured with a rubber band. This allows carbon dioxide gas to escape while keeping dust and insects out. Do not seal the jar with a lid during active fermentation or pressure can build up.
Leave the jar on your counter, away from direct sunlight, at a room temperature between 65°F and 75°F. Check it daily. Press the cabbage down if any shreds have floated above the brine. You should see small bubbles forming within 24 to 48 hours. That’s the Lactobacillus bacteria at work, producing carbon dioxide and lactic acid.
For a mild, slightly tangy sauerkraut, ferment for 5 to 7 days. For a more traditionally sour, deeply flavored German sauerkraut, allow 2 to 4 weeks. Taste it daily starting on day 5 and stop the fermentation by sealing the jar and moving it to the refrigerator when the flavor is exactly where you want it.
If you love the idea of using your finished sauerkraut in a comforting main dish, the slow cooker sauerkraut and pork recipe on Forkful Daily is a perfect next step.
Troubleshooting, Storing, and Flavor Variations
What Normal Looks Like vs. What to Throw Out
The most common worry for first-time fermenters is whether their batch has gone bad. Here’s a clear breakdown:
Normal signs:
- Cloudy brine (this is good, it means fermentation is active)
- Bubbles visible along the sides of the jar or on the surface
- A sour, tangy, yeasty smell that intensifies over time
- Slight fizziness when you press the cabbage down
Warning signs to watch for:
- Pink, black, or fuzzy mold growing on the surface above the brine
- A slimy, unpleasant texture throughout the cabbage (not just the top layer)
- A putrid or unpleasantly rotten smell (distinct from sharp sourness)
White or cream-colored sediment at the bottom of the jar is normal and harmless. A thin white film called kahm yeast can sometimes form on the brine surface. Kahm yeast isn’t dangerous, but it can add an off-flavor if left too long. Simply skim it off with a spoon. The golden rule: if the cabbage under the brine looks and smells good, it is good.
How to Store Finished Sauerkraut
Once fermented to your liking, seal the jar with a lid and transfer it to the refrigerator. Cold temperatures slow fermentation to a near-halt, preserving your sauerkraut at that exact flavor point. It will keep in the refrigerator for up to 6 months and often longer without any loss of quality.
Do not freeze sauerkraut if you want to preserve the live cultures. Freezing kills the beneficial bacteria. If you’re only interested in the flavor and not the probiotic benefit, freezing works fine for up to 3 months.
Flavor Variations to Try
The classic two-ingredient version is always the starting point, but once you have the basic lacto-fermented sauerkraut technique down, a few additions can make things interesting:
- Caraway seeds: 1 teaspoon per quart is traditional in German and Eastern European versions. Add them with the salt during the massage stage.
- Juniper berries: 4 to 5 lightly crushed berries add a piney, aromatic note that pairs beautifully with pork.
- Red cabbage: Swap green cabbage for red for a jewel-toned, slightly earthier kraut with a striking visual.
- Apple slices: Thin apple slices added to the jar add a mild sweetness that balances the sourness.
- Garlic cloves: 2 to 3 smashed cloves tucked into the jar give you a pungent, savory depth.
If you enjoy lacto-fermentation as a broader practice, the fermented pickles recipe uses the same brine-based method and is a great project to tackle alongside this one. You can also explore the easy homemade kimchi recipe if you want to bring Korean-style fermentation into your kitchen rotation.
Serving Ideas
Sauerkraut is endlessly versatile:
- Piled onto bratwurst or hot dogs with whole-grain mustard
- Stirred into creamy potato soup for a sharp, salty hit
- Layered into a Reuben sandwich with corned beef and Swiss cheese
- Served alongside pan-seared pork chops with a drizzle of the brine
- Folded into scrambled eggs for a surprisingly addictive breakfast
- Eaten straight from the jar as a tangy, probiotic-rich snack
Frequently Asked Questions
How long does homemade sauerkraut take to ferment?
The minimum fermentation time for a noticeably sour sauerkraut is about 5 days, but most recipes benefit from 1 to 4 weeks at room temperature. The longer you ferment, the more sour and complex the flavor becomes. Taste it daily after day 5 and move it to the refrigerator when the flavor hits your sweet spot.
Do I need to sterilize my mason jar?
You don’t need to sterilize it the way you would for canning. A thorough wash with hot, soapy water followed by a rinse is sufficient. The salt and the acidic environment created by fermentation protect the contents. That said, starting with a clean jar is important, so don’t skip washing it.
Why is my sauerkraut not producing enough brine?
If the cabbage isn’t releasing enough liquid, there are two likely causes. First, the cabbage itself may be older and drier than ideal. Second, you may not have massaged it long enough or firmly enough. Let the salted cabbage rest for 20 to 30 minutes after massaging. If there’s still not enough brine to submerge the cabbage, dissolve 1 teaspoon of non-iodized salt in 1 cup of filtered water and pour just enough over the cabbage to cover it.
Can I use iodized table salt for sauerkraut?
It’s best to avoid iodized salt. The iodine in standard table salt is added specifically to inhibit bacterial growth, which is the opposite of what you want in a fermentation project. Use kosher salt, fine sea salt, or dedicated pickling salt for reliable, safe, and well-textured results every time.
Conclusion
There’s something quietly remarkable about watching two humble ingredients transform into something tangy, crunchy, and alive on your counter. This recipe is proof that the most rewarding food projects are often the simplest ones, the kind that ask you to get out of the way and let time and bacteria do the heavy lifting.
Give this recipe a try this week. Start it on a Sunday, check it each morning with your coffee, and by the following weekend you’ll have a full jar of something genuinely worth eating.
For more recipes like this, follow us on Facebook and Pinterest for fermented food recipes and gut-healthy kitchen inspiration.