Most Dubai chocolate bar recipes miss one thing: the kataifi shouldn’t be soggy. It should snap when you bite it. That crisp, shredded phyllo layer is what makes this dessert.
If your chocolate seeps into the pastry and turns it soft, you’re missing a simple tempering step. This version keeps every layer distinct.
Here you’ll get exact temperatures for melting chocolate and a method for homemade pistachio cream. You can make the entire dessert in 75 minutes.
Table of Contents
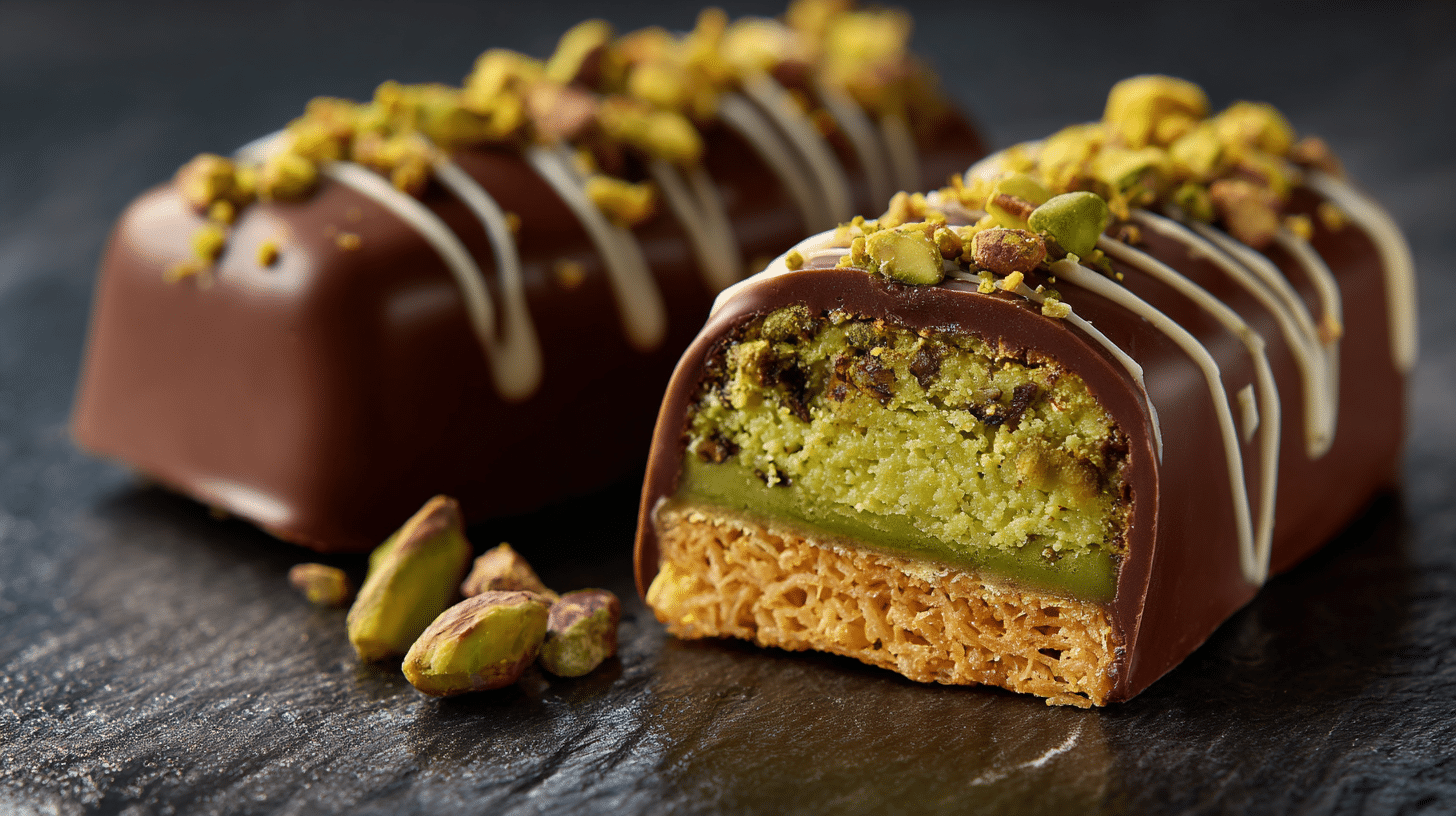
Table of Contents
What is the Dubai Chocolate Bar?
The Viral Sensation
If you’ve seen a glossy bar of chocolate cradling a bright green, nutty filling and a nest of golden shreds, you’ve met the viral Dubai chocolate bar. It’s a luxury confection that gained fame in Dubai’s high-end sweet shops, often costing over $20 for a single piece. This Dubai chocolate bar recipe brings that exact experience to your kitchen for a fraction of the price. The magic is in the texture: a crisp layer of baked kataifi pastry gives way to creamy pistachio filling, all wrapped in smooth, tempered chocolate.
What most store-bought versions get wrong is texture balance. The kataifi can turn soft and chewy if the chocolate isn’t handled right. My method uses specific temperatures to keep the chocolate shell firm and the pastry underneath audibly crunchy. You’ll use a simple bar mold to get that professional, geometric shape.
Inspired by Middle Eastern Knafeh
This modern treat has deep roots in classic Middle Eastern desserts. It’s a direct riff on knafeh (also spelled kadayif), the iconic warm pastry made with shredded phyllo dough, cheese or cream, and syrup. Instead of serving it hot, the Dubai chocolate bar reimagines those components as a portable, chilled delight.
Here’s how it translates:
- The kataifi provides the essential crispy texture.
- The sweet pistachio cream stands in for the traditional cheese filling.
- A hint of tahini adds a subtle, savory depth that cuts the sweetness, much like the syrup in knafeh does. It’s a clever fusion that turns a shareable plate of pastry into an elegant, individual chocolate bar. You can make this Dubai brownie recipe ahead and enjoy it straight from the fridge.
Why You’ll Love This Homemade Version
You have total control here. Store-bought bars often use artificial coloring and stabilizers. At home, you decide how vibrant your pistachio cream gets and how dark your chocolate should be. The process is surprisingly straightforward, 75 minutes from start to finish, with most of that time being hands-off chilling.
This homemade version wins because:
- The kataifi stays crisp. You’ll toast it in butter first for maximum crunch before it ever meets the chocolate.
- The pistachio flavor is real. We use real pistachio butter or a simple homemade cream, not just extract.
- You can customize it. Use dark chocolate for intensity or white chocolate for sweetness. Make it vegan with plant-based butter and dairy-free chocolate.
Once you master tempering chocolate in a double boiler, you can create endless variations. It’s more rewarding than buying one, and you end up with two generous bars to savor or share.
Print
The Easy Dubai Chocolate Bar Recipe You Can Make at Home
- Total Time: 75 min
- Yield: 2 servings 1x
Description
This homemade Dubai chocolate bar recipe layers crispy buttered kataifi pastry with creamy pistachio-tahini filling inside a smooth chocolate shell. It’s a modern take on Middle Eastern knafeh, ready in 75 minutes with no special equipment.
Ingredients
For the Chocolate Shell:
4 oz (115g) milk, dark, or white chocolate, chopped
For the Crispy Kataifi Base:
1 cup (50g) kataifi (shredded phyllo dough), thawed
2 tbsp unsalted butter (or vegan butter), melted
For the Pistachio Filling:
1/3 cup (80g) pistachio cream or pistachio butter
1 tsp tahini
1 tiny drop green food coloring (optional)
Optional Garnish:
1 oz (30g) white chocolate, for drizzling
2 tbsp crushed pistachios, for garnish
Instructions
1. Preheat oven to 350°F / 175°C. Line a baking sheet with parchment paper.
2. Loosen the thawed kataifi with your fingers into strands. Place in a bowl and drizzle with melted butter, tossing to coat evenly.
3. Spread the buttered kataifi in a thin layer on the baking sheet. Bake for 5-7 minutes, stirring once halfway, until golden and crisp. Let cool completely.
4. Make the filling by mixing pistachio cream and tahini in a small bowl until smooth. Add optional food coloring if using.
5. Chop the main chocolate into small pieces. Melt two-thirds of it in a double boiler over simmering water, stirring frequently until it reaches 113-115°F / 45-46°C for milk/white or 118-120°F / 48-49°C for dark.
6. Remove from heat and add remaining one-third of chopped chocolate, stirring until fully melted and the temperature drops to 86-88°F / 30-31°C.
7. Lightly brush two bar molds with oil or melted butter. Pour a thin layer of tempered chocolate into each mold, coating the bottom and sides.
8. Divide the cooled kataifi between molds, pressing gently into the chocolate base.
9. Spoon the pistachio filling over the kataifi, spreading evenly and leaving a small border.
10. Pour remaining tempered chocolate over filling to seal edges. Tap mold gently to remove air bubbles.
11. Garnish immediately with crushed pistachios or optional white chocolate drizzle.
12. Place molds on a flat tray and freeze for at least 40 minutes, or until solid. Pop bars out of molds to serve.
Notes
Store finished bars in an airtight container in the refrigerator for up to 14 days.
For longer storage, wrap bars tightly and freeze for up to 3 months. Thaw in refrigerator before serving.
Let baked kataifi cool completely before assembling to prevent a soggy chocolate shell.
If you don’t have pistachio cream, mix almond butter with 1/4 tsp almond extract as a substitute.
A digital thermometer is best for tempering chocolate accurately.
- Prep Time: 30 min
- Cook Time: 5 min
- Category: Dessert
- Method: Stovetop and Bake
- Cuisine: Middle Eastern
Nutrition
- Serving Size: 1 bar
- Calories: 475 kcal
- Sugar: 32 g
- Sodium: 45 mg
- Fat: 35 g
- Saturated Fat: 16 g
- Unsaturated Fat: 19 g
- Trans Fat: 0 g
- Carbohydrates: 38 g
- Fiber: 3 g
- Protein: 8 g
- Cholesterol: 25 mg
Essential Ingredients & Equipment
Active Time: 30 minutes Total Time: 1 hour 15 minutes Yield: 2 large bars
No pistachio cream? Use almond butter mixed with 1/4 tsp almond extract. No kataifi? Crushed plain cornflakes toasted in butter make a decent textural substitute in a pinch.
Key Ingredients Explained
The right ingredients make this homemade Dubai chocolate bar work. Start with the chocolate: I use 4 ounces of chopped chocolate bars, not chips. Chips have stabilizers that can mess with the smooth finish you need for a clean snap. Milk chocolate is classic, but dark chocolate balances the sweet filling perfectly.
Kataifi is non-negotiable for the authentic crisp layer. It’s shredded phyllo dough, found frozen in Middle Eastern grocery stores or sometimes in the international freezer aisle of larger supermarkets. You’ll thaw it and toss it with melted butter before toasting, which gives it that golden color and prevents sogginess.
The filling is just two things: pistachio cream and tahini. The pistachio cream provides the primary flavor and creamy texture. The tahini isn’t just for show; its subtle bitterness cuts the sweetness, mimicking the role of syrup in traditional knafeh. If your pistachio cream is very pale, a single drop of green food coloring boosts the visual appeal.
Quality Sourcing Tips
You can find everything for this Dubai chocolate bar recipe without a special trip. For the kataifi, check the freezer section at stores like Whole Foods, Patel Brothers, or any Mediterranean market. It’s often labeled “kadayif” or “shredded dough for kunafa.” Let it thaw in its package in the fridge overnight, or on your counter for an hour.
Your chocolate choice matters more than you think. A good baking bar like Ghirardelli or Callebaut melts and tempers better than waxy candy melts. For the pistachio component, look for pure pistachio butter at health food stores, Trader Joe’s, or online. If you only find salted pistachio butter, simply omit any added salt from other steps.
Tahini is easy now, most well-stocked supermarkets carry it near other nut butters or in the international aisle. Stir the jar well before using, as the oil separates. The runnier, smoother tahini blends into the filling much easier than a thick, pasty one.
Equipment Needed
You don’t need professional pastry tools. The most important piece is the two-bar molds. I use two 6-inch rectangular silicone bar molds. Silicone is best because you can pop the frozen bars out effortlessly without breaking them. If you don’t have molds, you can shape the base on a parchment-lined tray and pour the chocolate over it free-form.
A double boiler is essential for tempering chocolate without seizing it. You can improvise one by placing a heatproof bowl (glass or metal) over a pot of simmering water, ensuring the bottom of the bowl doesn’t touch the water. You’ll also need a baking sheet for toasting the kataifi and a small saucepan to melt the butter.
Finally, have a pastry brush handy to grease your molds lightly with butter or oil, and a fork or small whisk for stirring the pistachio filling until it’s perfectly smooth. A microwave is helpful for quickly melting a small amount of white chocolate for an optional drizzle at the end.
Ingredients
- 4 oz (115g) milk, dark, or white chocolate, chopped
- 1 cup (50g) kataifi (shredded phyllo dough), thawed
- 2 tbsp unsalted butter (or vegan butter), melted
- 1/3 cup (80g) pistachio cream or pistachio butter
- 1 tsp tahini
- Green food coloring (optional, a tiny drop)
- 1 oz (30g) white chocolate, for drizzling (optional)
- Crushed pistachios, for garnish
How to Make Dubai Chocolate Bars: Step-by-Step
This Dubai chocolate bar recipe is a simple assembly of three parts: crispy kataifi, creamy pistachio filling, and a tempered chocolate shell. Follow these steps in order for the best results.
Prepare the Kataifi Filling
This step is all about creating a dry, crunchy base and a smooth, flavorful filling. Work quickly with the kataifi once it’s out of the package, as it dries out.
- Preheat your oven to 350°F / 175°C. Line a baking sheet with parchment paper.
- Loosen the thawed kataifi with your fingers, pulling it apart into strands. Place it in a bowl.
- Drizzle the melted butter over the kataifi and use your hands to toss and coat every strand evenly.
- Spread the buttered kataifi in a thin, even layer on your prepared baking sheet. Bake for 5-7 minutes, stirring once halfway, until it’s golden brown and crisp. Let it cool completely on the sheet.
- While the kataifi cools, make the filling. In a small bowl, mix the pistachio cream and tahini until smooth and fully combined. Add a tiny drop of green food coloring here if you want a more vibrant hue.
Watch Out: Don’t skip cooling the kataifi. If it’s warm when you add the chocolate, the heat will melt the shell and make the pastry soggy.
Melt and Temper the Chocolate
Tempering is what gives the chocolate its snap and glossy finish. It stabilizes the cocoa butter so the bar sets firm at room temperature.
- Chop your 4 oz of chocolate into small, even pieces for even melting.
- Set up a double boiler. Bring 1-2 inches of water to a gentle simmer in a small pot, then reduce the heat to low.
- Place about two-thirds of the chopped chocolate in a heatproof bowl that sits snugly on top of the pot, ensuring the bottom doesn’t touch the water.
- Stir frequently with a dry spatula until the chocolate is completely melted and smooth. Check the temperature with a digital thermometer; you want it to reach 113-115°F / 45-46°C for milk or white chocolate, or 118-120°F / 48-49°C for dark.
- Immediately remove the bowl from the heat. Add the remaining one-third of the chopped chocolate and stir continuously until it’s all melted and the temperature drops to 86-88°F / 30-31°C.
Chef’s Note: If you don’t have a thermometer, do the “lip test”. Dab a bit of chocolate on your upper lip. It should feel cool, not warm. That’s the tempered state.
Assemble and Set the Bars
Now for the fun part: building the layers. Have your molds and cooled components ready to go.
- Lightly brush your bar molds with a tiny bit of oil or melted butter.
- Pour a thin layer of tempered chocolate into the bottom of each mold, just enough to coat it. Use a spoon or brush to spread it up the sides.
- Divide the cooled, crispy kataifi between the molds, pressing it gently into the chocolate base to form an even layer.
- Spoon the pistachio-tahini filling over the kataifi, spreading it into a smooth, even layer. Leave a small border around the edges.
- Pour the remaining tempered chocolate over the filling, ensuring it seals all the edges. Tap the mold gently on the counter to remove air bubbles.
- Garnish the top immediately with crushed pistachios or a drizzle of melted white chocolate, if using.
- Place the molds on a flat tray and freeze for at least 40 minutes, or until completely solid. Once set, pop the bars out of the molds. Store them in the fridge for up to 14 days, or wrap tightly and freeze for 3 months.
Tips, Variations & Storage
Pro Tips for Success
Use a digital thermometer for tempering. Guessing by eye leads to soft chocolate that never properly sets. For milk chocolate, take it off the double boiler at 115°F / 46°C, then cool it down to 88°F / 31°C while stirring. If your kitchen is warm, place the bowl of tempered chocolate over a larger bowl of cool water for a minute to help it reach that target temperature faster.
Brush your silicone molds with a neutral oil instead of butter. A thin film of vegetable or coconut oil ensures a perfectly clean release without any greasy residue on your finished chocolate shell.
Creative Variations
For a vegan Dubai chocolate bar, use plant-based butter to toast the kataifi and choose a high-quality dairy-free chocolate bar for the shell. The tahini in the filling is already vegan, so just pair it with a nut butter of your choice.
You can swap the pistachio cream for other nut butters. Almond butter with a drop of almond extract works beautifully. For a hazelnut version, use homemade Nutella (blend roasted hazelnuts with cocoa powder and a touch of maple syrup) and skip the tahini.
Want more texture? Fold 1 tablespoon of finely chopped dried rose petals or toasted sesame seeds into the cooled kataifi before pressing it into the mold. It adds little bursts of flavor and makes the middle layer even more interesting.
How to Store and Serve
Always store these bars in the fridge. The cold keeps the chocolate shell firm and the kataifi crisp. They last up to 14 days in an airtight container. For longer storage, wrap each bar tightly in plastic wrap, then place them in a freezer bag. They freeze perfectly for 3 months.
| Refrigerator | Up to 14 days | Keep in an airtight container. |
| Freezer | Up to 3 months | Wrap tightly in plastic first to prevent freezer burn. |
To serve, let a frozen bar thaw in the fridge for an hour or on the counter for 15 minutes. Don’t let it sit out too long, or condensation will form on the chocolate.
For serving:
- Use a sharp knife warmed under hot water and dried to get clean slices through the hard chocolate shell.
- Pair a small piece with strong black coffee to balance the sweetness.
- If you’re making them for a party, assemble and freeze the bars up to a week ahead, then simply arrange them on a platter straight from the freezer.
Troubleshooting
| Kataifi isn’t crispy enough. | Toast it longer at 350°F / 175°C, up to 10 minutes, until deeply golden and dry to the touch. |
| Chocolate seized or burned. | Always melt in a double boiler, not direct heat. If it seizes (becomes grainy), stir in 1 tsp of vegetable oil until smooth again. |
| Chocolate won’t temper properly. | Use chopped baking bars, not chips, see the ‘Key Ingredients Explained’ section for why. If you don’t have a thermometer, try the “lip test”: dab a bit of chocolate on your upper lip; it should feel cool, not warm. |
| Filling is too sweet or thick. | Add an extra ½ tsp of tahini to cut sweetness. For a softer filling, stir in 1 tsp of mild-flavored oil. |
| Shell cracked when unmolding. | This usually means the chocolate wasn’t properly tempered or was frozen too rapidly. Thaw frozen bars in the fridge first next time. |
Your Dubai Chocolate Bar Recipe Questions, Answered
What does Dubai chocolate taste like?
It’s a mix of textures and flavors. You get the clean snap of tempered chocolate first, then creamy, nutty pistachio filling with a hint of savory tahini. The bottom layer is buttery, shredded kataifi that adds a crisp crunch, similar to the top of a knafeh. It’s sweet, rich, and surprisingly complex.
What is knafeh?
Knafeh (also spelled kadayif) is a classic Middle Eastern pastry. It’s made by baking shredded phyllo dough (kataifi) with a filling, often sweet cheese or cream, and then soaking it in a sugar syrup. This Dubai chocolate bar recipe is a modern, portable take on those flavors, swapping the syrup for a chocolate shell.
What is kataifi?
Kataifi is shredded phyllo dough, found frozen in Middle Eastern grocery stores. For this recipe, you thaw it, toss it with melted butter, and bake at 350°F / 175°C for 5-7 minutes until golden and crisp. This creates the essential crunchy base layer that defines the bar’s texture and connects it to traditional knafeh.
The key to this Dubai chocolate bar recipe is cooling the kataifi completely and tempering your chocolate to 86-88°F / 30-31°C. Those two steps guarantee the perfect contrast of a crisp pastry layer and a chocolate shell that snaps. It’s absolutely worth making for that flavor and texture.
I always make a double batch to keep in the freezer. You should try it this weekend, the 75-minute active time is totally doable, and the result feels so special.
Will you stick with classic pistachio or try a different nut butter for the filling?
For more recipes like this one, follow us on Facebook and Pinterest for more show-stopping dessert ideas and clever pastry techniques.