Refrigerator pickles were the first thing my grandmother let me “make on my own”, and I still remember the sharp, garlicky brine smell that filled her kitchen the next morning when she cracked the jar open over scrambled eggs.
 20")
Most people assume homemade pickles mean hours at the stove, a water-bath canner, and a kitchen that smells like a sauna. This recipe skips every bit of that without sacrificing crunch or flavor.
By the end, you’ll know exactly which cucumbers give you the crispest bite, why a quick brine warm-up matters, and how to customize the spice blend to your taste.
Table of Contents
Why refrigerator pickles are better than store-bought
Walk down any grocery store condiment aisle and you’ll find pickles packed with yellow dye, polysorbate 80, and enough sodium to make your dentist nervous. Homemade refrigerator pickles give you full control over every ingredient. That control translates into a cleaner, brighter, more complex flavor that no mass-produced jar can match.
The flavor difference is real
Commercial pickles are pasteurized, which kills off the volatile aromatic compounds in fresh dill and mellows garlic into a soft, indistinct background note. When you make refrigerator pickles at home, the garlic stays punchy, the dill stays grassy and bright, and the brine tastes genuinely tangy rather than one-dimensional sour. Bite into a homemade spear and you get a satisfying crunch followed by a wave of flavor that actually lingers.
No special equipment needed
Traditional canning requires a water-bath canner, jar lifters, a rack, and careful headspace measurement. If you get the seal wrong, you risk spoilage. No-canning pickles sidestep all of that. You need a saucepan, a couple of wide-mouth mason jars, and a refrigerator. The cold temperature does the preservation work, and the whole project costs less than four dollars in ingredients.
Quick pickles fit a busy schedule
Prep time is about ten minutes. You slice the cucumbers, pack the jars, pour the warm brine, and walk away. By the next evening you have a jar of crunchy refrigerator pickles ready to go on burgers, grain bowls, cheese boards, or eaten straight from the jar standing in front of the open fridge (no judgment here). If you are already browsing easy summer meals 25 bold fast recipes ready in 35 minutes or less, these pickles deserve a permanent spot on that rotation.
The speed and simplicity also make this a great gateway project for anyone curious about preserving food at home. Once you nail the basic brine, you’ll find yourself experimenting with every vegetable in your crisper drawer.
Print 19")
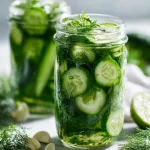
Crunchy Refrigerator Pickles (No Canning Required)
- Total Time: 1455 min
- Yield: 20 servings 1x
- Diet: Vegan
Description
Homemade refrigerator pickles made with fresh Kirby cucumbers, dill, garlic, and a simple vinegar brine. No canning equipment needed. Ready in 24 hours and crisp enough to eat straight from the jar.
Ingredients
For the pickles:
1.5 lbs Kirby or pickling cucumbers (washed, ends trimmed, cut into spears or 1/4-inch slices)
4 garlic cloves (smashed)
1/2 cup fresh dill fronds and stems (packed)
1 tsp mustard seeds
1 tsp black peppercorns
2 bay leaves
For the brine:
1 cup white vinegar (5% acidity)
1 cup water
1 tbsp pickling salt or kosher salt
1 tsp granulated sugar
Instructions
1. Prep the cucumbers: Wash cucumbers thoroughly and scrub the skin. Trim both ends, removing a thin slice from the blossom end. Cut into spears or quarter-inch slices depending on your preference.
2. Pack the jars: Divide the smashed garlic, fresh dill, mustard seeds, black peppercorns, and bay leaves evenly between two clean wide-mouth quart mason jars. Pack the cucumber pieces in tightly on top of the aromatics, standing spears upright where possible.
3. Make the brine: Combine white vinegar, water, pickling salt, and sugar in a small saucepan. Heat over medium, stirring constantly, until the salt and sugar fully dissolve, about 3 to 4 minutes. Do not boil. Remove from heat and let cool for 5 minutes.
4. Pour the brine: Carefully pour the warm brine over the packed cucumbers in each jar, filling to within 1/2 inch of the rim. Tap the jars gently on the counter to release trapped air bubbles.
5. Seal and cool: Wipe the jar rims clean with a damp cloth, then seal with lids. Let the jars sit at room temperature for 30 minutes until no longer warm to the touch.
6. Refrigerate: Transfer the sealed jars to the coldest part of your refrigerator. Wait at least 24 hours before opening. The pickles reach peak flavor between 48 and 72 hours.
Notes
Store sealed jars in the refrigerator for up to 3 weeks. These pickles are not shelf-stable and should not be stored at room temperature.
For extra crunch, always trim the blossom end of each cucumber before packing. That end contains enzymes that soften the flesh over time.
Use pickling salt or kosher salt only. Iodized table salt clouds the brine and can soften the cucumbers.
To make spicy pickles, add 2 to 3 thin-sliced jalapeno rounds per jar along with the other aromatics.
- Prep Time: 10 min
- Rest Time: 1440 min
- Cook Time: 5 min
- Category: Side Dishes
- Method: No-Cook
- Cuisine: American
Nutrition
- Serving Size: 2 spears or 6 slices
- Calories: 10 kcal
- Sugar: 1 g
- Sodium: 280 mg
- Fat: 0 g
- Saturated Fat: 0 g
- Unsaturated Fat: 0 g
- Trans Fat: 0 g
- Carbohydrates: 2 g
- Fiber: 0 g
- Protein: 0 g
- Cholesterol: 0 mg
The best cucumbers and ingredients for crunchy results
The number one complaint about homemade pickles is soft, mushy texture. Nine times out of ten, the culprit is the wrong cucumber.
Choosing your cucumbers
Not all cucumbers are created equal when it comes to pickling. Here is a quick breakdown:
| Cucumber Variety | Texture After Brining | Notes |
|---|---|---|
| Kirby cucumbers | Firm and snappy | Best overall for classic dill pickles |
| Persian cucumbers | Crisp, slightly thinner skin | Great for snacking spears |
| Pickling cucumbers | Very firm, bumpy skin | Traditional choice, widely available |
| English cucumbers | Soft after 24 hours | Not recommended for refrigerator pickles |
Kirby and pickling cucumbers have thicker skins and denser flesh, which means they hold up against the acidic brine and stay crunchy for up to two weeks. English cucumbers are mostly water, and they turn limp almost immediately. Save those for a cucumber salad recipe instead.
The brine ingredients
A balanced brine is equal parts acid, water, and a little sweetness to round out the tang. Here is what each ingredient does:
- White vinegar: Sharp, clean acid that keeps the flavor neutral and lets the dill and garlic shine. Use 5% acidity.
- Apple cider vinegar: Adds a subtle fruity depth. You can use it as a full or partial substitute for white vinegar.
- Pickling salt or kosher salt: Fine-grain pickling salt dissolves cleanly without clouding the brine. Iodized table salt turns the brine murky and can soften the cucumbers.
- Sugar: Just a small amount balances acidity and takes the sharp edge off. You are not making bread-and-butter pickles here, so keep it minimal.
- Fresh dill: Use the fronds and the flowering heads if you can find them. Dried dill works in a pinch but delivers about 60% of the aromatic punch.
- Garlic cloves: Smash them with the flat of a knife to release more flavor before dropping them into the jar.
- Mustard seeds and black peppercorns: These bloom slowly in the brine and add a subtle warmth that builds over the first two or three days.
- Bay leaf: One per jar adds a faint herbal note that rounds out the overall flavor.
One trick for extra crunch
Slice off the blossom end of each cucumber before packing the jar. The blossom end contains enzymes that break down pectin, and pectin is what keeps vegetable cells firm. Removing that sliver of skin adds no time to your prep and makes a noticeable difference in texture.
How to make refrigerator dill pickles step by step
The process for homemade refrigerator pickles is genuinely simple, but a few small technique choices separate a good jar from a great one.
Step 1: Prep the cucumbers
Wash your cucumbers thoroughly under cold running water and scrub the skin lightly to remove any field dirt. Trim both ends, then cut into your preferred shape. Spears (quartered lengthwise) give you the most surface area for brine absorption. Slices (about a quarter inch thick) are ready to eat faster because the brine penetrates smaller pieces more quickly. Whole cucumbers take the longest but stay crunchiest because less cut surface is exposed to acid.
Step 2: Pack the jars
Layer your aromatics at the bottom of clean, wide-mouth quart mason jars first: two smashed garlic cloves, a generous handful of fresh dill (stems and all), half a teaspoon of mustard seeds, half a teaspoon of black peppercorns, and one bay leaf. Then pack the cucumbers in tightly, standing spears upright or layering slices so they are snug but not crushed. Tightly packed jars prevent the cucumbers from floating up once you add the brine.
Step 3: Make the warm brine
Combine 1 cup of white vinegar, 1 cup of water, 1 tablespoon of pickling salt, and 1 teaspoon of sugar in a small saucepan. Heat over medium, stirring until the salt and sugar dissolve completely. This takes about 3 to 4 minutes. You don’t need to bring it to a rolling boil. Warm brine poured over the cucumbers opens the pores slightly, helping the flavor absorb faster while still leaving enough texture intact to keep things crunchy. Let the brine cool for about 5 minutes off the heat before pouring.
Step 4: Pour and seal
Pour the warm brine over the packed cucumbers, filling the jars to within half an inch of the rim. Tap the jars gently on the counter to release any air bubbles. Wipe the rims clean, seal with lids, and let the jars cool to room temperature for about 30 minutes. Transfer to the refrigerator.
Step 5: Wait (the hardest part)
Refrigerator dill pickles need at least 24 hours before they are worth opening, and they reach peak flavor somewhere between 48 and 72 hours. The brine continues to season the cucumbers throughout the first week. Try one at 24 hours and again at 48 hours and notice how much more depth the garlic and mustard seeds develop. The smell when you open the jar on day two is deeply satisfying: sharp vinegar, fresh dill, and warm garlic.
Variations, storage, and serving ideas
Once you have the base recipe down, the creative possibilities are wide open. Quick pickles made this way work with nearly any firm vegetable, and the brine formula scales up easily.
Flavor variations to try
- Spicy refrigerator pickles: Add 2 to 3 thin-sliced rounds of fresh jalapeño or a pinch of red pepper flakes to each jar. The heat mellows after 48 hours into a pleasant, slow burn.
- Bread and butter style: Double the sugar to 3 teaspoons, add a quarter teaspoon of turmeric for color, and throw in thin-sliced onion rings.
- Garlic-forward: Use 4 cloves per jar instead of 2, and add a small slice of fresh horseradish root for a sharp, peppery edge.
- Everything bagel pickles: Swap the mustard seeds and peppercorns for a tablespoon of everything bagel seasoning. Genuinely addictive on a cream cheese sandwich.
- Apple cider vinegar brine: Replace the white vinegar entirely with apple cider vinegar for a slightly sweeter, more complex tang. Pairs especially well with Persian cucumbers.
The same brine works beautifully on thinly sliced red onions, carrot coins, green beans, and radishes. Each vegetable brings its own texture and color to the jar.
How to use your pickles
Crunchy refrigerator pickles belong in more places than just the side of a sandwich:
- Chopped into tartar sauce or potato salad for bright acidity
- Layered onto smash burgers with American cheese and caramelized onion
- Served alongside a viral pickle dip recipe as a party snack board centerpiece
- Sliced thin and added to a grain bowl with feta and roasted chickpeas
- Eaten cold, straight from the jar, as a low-calorie crunch fix
Storage tips
Refrigerator pickles are not shelf-stable. They must stay refrigerated at all times and will keep well for up to three weeks in a sealed jar. After three weeks, the cucumbers begin to soften noticeably, and the brine flavor becomes increasingly sharp and one-dimensional. Label the jar with the date you made it so you’re not guessing later. Store them in the coldest part of your refrigerator, typically toward the back on a middle shelf, rather than in the door where temperature fluctuates every time you open it.
If you enjoy this kind of tangy, fermented flavor and want to take things a step further, you might enjoy exploring a fermented pickles recipe that uses wild lacto-fermentation instead of vinegar. The process is slower but the flavor is extraordinary.
Frequently asked questions
What is the difference between regular pickles and refrigerator pickles?
Store-bought pickles go through a hot water-bath canning process that creates a shelf-stable, vacuum-sealed product. Refrigerator pickles skip the heat-processing step entirely and rely on the cold temperature of your refrigerator to slow bacterial growth. The result is a fresher, crunchier pickle that lasts three weeks in the fridge rather than years on a shelf.
What are the best cucumbers to use for refrigerator pickles?
Kirby cucumbers and labeled pickling cucumbers are your best options. They have thick skins, firm flesh, and low water content, all of which keep them crunchy after brining. Persian cucumbers also work well for snacking-size spears. Avoid English cucumbers and standard slicing cucumbers, which have thinner skins and higher water content that leads to a soft, soggy texture.
Do I need to boil the vinegar for refrigerator pickles?
You don’t need to bring it to a boil. Heating the brine just enough to dissolve the salt and sugar, roughly 3 to 4 minutes over medium heat, is all that is required. A warm brine helps the cucumbers absorb flavor faster than a cold brine would, but a hard boil is unnecessary and can actually start to soften the cucumbers before they even go into the jar.
How long will homemade refrigerator pickles keep?
Properly sealed and stored in the coldest part of your refrigerator, homemade refrigerator pickles will stay crisp and flavorful for up to three weeks. For the best texture and taste, try to finish them within the first two weeks. Always use a clean utensil when reaching into the jar to avoid introducing bacteria that could speed up spoilage.
Conclusion
Making refrigerator pickles at home is one of those small kitchen projects that delivers outsized satisfaction. A jar of these sitting in your fridge makes every meal feel a little more complete, from a weekday sandwich to a weekend charcuterie spread.
Give this recipe a try this week. The active time is under 15 minutes, and by Thursday evening you will have two jars of the crunchiest, most flavorful pickles you have ever tasted.
For more recipes like refrigerator pickles, follow us on Facebook and Pinterest for fresh preserving and homemade condiment ideas.