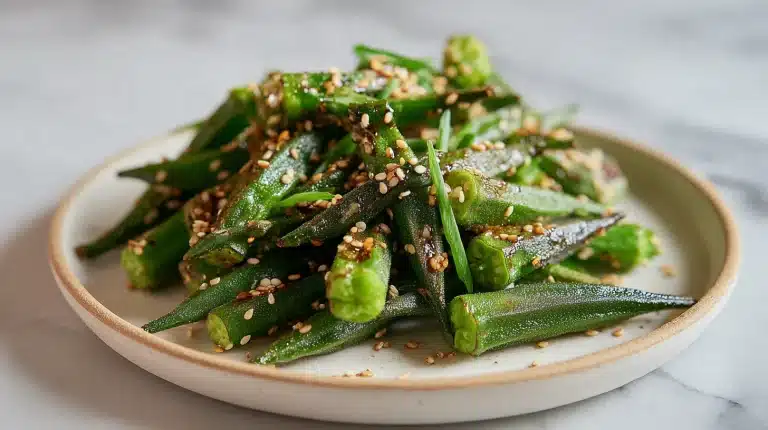
The best ball canning recipe for pickled okra I ever tasted came straight from a church potluck in Georgia, tucked beside a platter of fried chicken like it was no big deal. One bite of that snappy, garlicky pod and I spent the next two years trying to recreate it.

Most people give up on canning pickled okra after one limp, slimy batch. This recipe solves that exact problem with a cold-pack method and a carefully balanced brine that keeps every pod firm and snappy from jar to table.
Coming up: how to select the right okra pods for maximum crunch, the brine ratio that delivers bold tangy flavor, and the water bath processing steps that make these jars shelf-stable for up to a year.
Table of Contents
Why okra is actually perfect for pickling
Okra has a reputation problem. Most people who wrinkle their nose at it have only eaten it cooked until it goes soft and sticky. Raw okra is a completely different story. When you pack it into a bright, acidic brine, something wonderful happens. The vinegar tightens the cell walls, the salt draws out just enough moisture, and the pod stays crisp and snappy rather than turning into that gummy texture everyone fears.
The science behind crispy pickled okra
The sliminess in okra comes from mucilage, a soluble fiber that activates and thickens when exposed to heat and water. Pickling works in your favor because the acidity of the brine interrupts that process. When you cold-pack the raw pods directly into hot jars without blanching them first, you preserve their structural integrity far better than any cooked method.
Pod size matters. Okra pods between two and four inches long are the sweet spot for a ball canning recipe. Anything longer develops a woody interior that no amount of brine can fix. Anything under two inches gets overwhelmed by the brine and turns rubbery. Walk past those oversized pods at the farmers market and save them for stews.
Choosing the right pods
Look for okra with these qualities:
- Bright, deep green color with no yellowing at the tips
- Firm texture when you squeeze gently, no soft spots
- Clean-cut stem ends, not brown or dried out
- Uniform size across your batch so every jar processes evenly
- Pods free of blemishes, small black spots, or splitting seams
If you grow your own okra, harvest in the morning when the plants are still cool and process the same day. Okra loses its crispness faster than almost any other vegetable once picked. Farmers market okra is your next best option, but grocery store okra sitting under fluorescent lights for three days will never give you the same snap.
Fresh okra also carries real nutritional value. For other ways to use this vegetable, check out our homemade sauerkraut recipe and our okra water recipe.
Print
Ball Canning Recipe for Pickled Okra: Crispy, Tangy Jars Every Time
- Total Time: 55 min
- Yield: 6 pint jars 1x
- Diet: Vegan
Description
This pickled okra recipe uses Ball pint jars and a water bath canning method to produce crispy, tangy pods packed with dill, garlic, and a sharp vinegar brine. The cold-pack technique keeps each pod firm and snappy. Yields approximately 6 pint jars.
Ingredients
For the brine:
4 cups distilled white vinegar (5% acidity)
4 cups water
1/4 cup Ball pickling and canning salt
For each pint jar (x6):
3 to 4 oz fresh okra pods (2 to 4 inches long, stems trimmed to 1/4 inch)
1 fresh dill head (or 1 teaspoon dried dill seed)
2 garlic cloves (peeled and lightly smashed)
1/4 teaspoon crushed red pepper flakes
1/4 teaspoon mustard seed
1/4 teaspoon black peppercorns
Instructions
1. Prepare your equipment. Wash 6 Ball pint jars, lids, and bands in hot soapy water. Inspect each jar rim for chips or cracks. Fill your water bath canner with enough water to cover jars by 1 inch and begin heating over high heat. Keep jars hot in simmering water until ready to fill.
2. Make the brine. Combine the white vinegar, water, and pickling salt in a large saucepan. Bring to a rolling boil over medium-high heat, stirring until the salt fully dissolves. Keep the brine at a gentle boil while you pack the jars.
3. Prepare the okra. Rinse pods under cold water and pat dry. Trim each stem end to about 1/4 inch above the cap, leaving the pod sealed to help maintain crunch.
4. Pack the jars. Working one jar at a time, add dill, garlic cloves, red pepper flakes, mustard seed, and peppercorns to the bottom of each hot jar. Stand okra pods upright, alternating stem direction up and down to fit as many pods as possible. Pack firmly but without bruising the pods.
5. Add the brine. Ladle hot brine over the packed okra, maintaining 1/4 inch headspace measured from the top of the brine to the jar rim. Run a bubble remover tool around the inside edge of the jar to release any trapped air pockets.
6. Seal the jars. Wipe each jar rim with a clean damp cloth to remove any brine residue. Place a new lid on each jar and screw on the band to fingertip tight, not over-tightened.
7. Process in the water bath. Lower filled jars onto the canner rack. Ensure water covers jars by at least 1 inch. Bring to a full rolling boil and process for 10 minutes. At altitudes above 1,000 feet, add 1 minute per 1,000 feet of elevation.
8. Cool and check seals. Turn off heat and remove the canner lid. Let jars rest in the water for 5 minutes, then lift out with a jar lifter and set on a folded towel 1 inch apart. Do not tilt or disturb jars for 12 to 24 hours. After 24 hours, press the center of each lid to confirm a rigid seal. Any unsealed jar goes straight to the refrigerator.
9. Rest before opening. Label sealed jars with the date and store in a cool, dark pantry. Wait at least 48 hours before opening, and allow 1 to 2 weeks for full flavor development.
Notes
Store sealed jars in a cool dark pantry for up to 12 to 18 months. Once opened, refrigerate and use within 4 weeks.
Use only okra pods between 2 and 4 inches long. Larger pods develop a woody interior and tend to go soft during processing.
For spicy pickled okra, increase red pepper flakes to 1/2 teaspoon per jar and add 1 whole dried Thai chili per jar.
Apple cider vinegar (5% acidity) can replace white vinegar for a slightly fruity, mellower brine. Do not use homemade or raw vinegars with uncertain acidity.
Do not use table salt or sea salt in place of Ball pickling and canning salt. Anti-caking agents in regular salt will cloud the brine.
- Prep Time: 45 min
- Cook Time: 10 min
- Category: Side Dishes
- Method: Stovetop
- Cuisine: American
Nutrition
- Serving Size: 1 pint jar
- Calories: 25 kcal
- Sugar: 2 g
- Sodium: 580 mg
- Fat: 0 g
- Saturated Fat: 0 g
- Unsaturated Fat: 0 g
- Trans Fat: 0 g
- Carbohydrates: 5 g
- Fiber: 2 g
- Protein: 1 g
- Cholesterol: 0 mg
The brine, the spices, and the ball jar method
The brine is where this pickled okra canning recipe earns its reputation. Ball’s tested ratio for safe water bath canning is a minimum of five percent acidity vinegar. This recipe uses distilled white vinegar at full strength for clean, sharp flavor. You can swap in apple cider vinegar for a slightly mellower, fruitier brine, but stay away from homemade vinegars or anything with unclear acidity because the pH matters for food safety.
Building your brine
For six pint jars, combine:
- 4 cups distilled white vinegar (5% acidity)
- 4 cups water
- 1/4 cup Ball pickling and canning salt (not table salt, which clouds the brine)
Bring that mixture to a rolling boil and hold it there while you pack your jars. The pickling salt dissolves cleanly and does not contain the anti-caking agents in regular table salt that make your brine go murky.
Layering your spices
Each pint jar gets:
- 1 fresh dill head or 1 teaspoon dried dill seed
- 2 garlic cloves, peeled and lightly smashed
- 1/4 teaspoon crushed red pepper flakes
- 1/4 teaspoon mustard seed
- 1/4 teaspoon black peppercorns
Pack the spices into the bottom of the hot jar, then stand your okra pods upright with the stems alternating direction, some pointing up and some pointing down. This interlocking method lets you fit more pods per jar and keeps them from floating up when the hot brine hits.
Fill within half an inch of the top rim. Ladle in the hot brine to cover the pods completely, leaving a quarter-inch headspace measured from the top of the liquid to the rim of the jar.
Ball jar processing notes
Ball Wide Mouth Pint jars are the recommended vessel for this recipe because the wide opening makes packing those long vertical pods clean and easy. Regular mouth pints work too but require a bit more patience and a thin butter knife to coax the pods into position without bruising them.
Water bath canning: step-by-step process
Water bath canning can feel intimidating the first time, but once you work through it once, the rhythm becomes second nature. The process relies on heat to create a vacuum seal and eliminate any bacteria that could spoil your jars. When done correctly with a tested, acidic recipe like this one, the result is shelf-stable canned pickled okra that will sit safely in your pantry for twelve to eighteen months.
Equipment you need before you start
Gather everything before your okra hits the counter:
- Ball water bath canner with rack (or a large stockpot with a round wire rack)
- Ball pint jars, six of them, washed and inspected for nicks or chips
- New lids for every jar (bands can be reused, lids cannot)
- Jar lifter
- Wide-mouth canning funnel
- Bubble remover and headspace tool
- Clean damp cloth for wiping rims
- Ladle and large pot for your brine
Processing step by step
Start your canner of water heating first. It takes a while to bring that volume of water to a full boil, and you want it ready the moment your jars are packed. Keep your jars hot until you fill them, either in the canner itself or in a separate pot of simmering water.
When your brine is boiling and your jars are hot, work one jar at a time. Add your spices, pack your okra tightly but without forcing them, then ladle in brine to a quarter-inch headspace. Run your bubble remover around the inside edge to release any trapped air pockets. Wipe the rim with a clean, damp cloth because any brine on the rim will prevent a proper seal. Place the lid, screw on the band to fingertip tight, and lower it into the canner.
Process the jars for 10 minutes once the water returns to a full rolling boil. At altitudes above 1,000 feet, add one minute of processing time for every 1,000 feet of elevation. Turn off the heat, remove the canner lid, and let the jars sit in the water for 5 minutes before lifting them out with your jar lifter.
Set the jars on a folded kitchen towel at least one inch apart. You will hear the satisfying “ping” of each lid sealing as the jars cool over the next hour. That sound is one of the best things about this entire process.
Do not tilt, press, or disturb the jars for 12 to 24 hours. After 24 hours, press the center of each lid. It should be rigid and not flex up and down. If any lid flexes, that jar did not seal and should go straight into the refrigerator to be eaten within a month.
Wait at least 48 hours before opening your first jar, though the flavor truly deepens after a full week. The brine needs time to penetrate every pod.
Flavor variations and serving ideas
Once you have mastered the base ball pickled okra recipe, the variations are genuinely fun to explore. The fundamental brine ratio and processing time stays the same. What changes is the spice pack inside each jar.
Spicy pickled okra
Double the crushed red pepper flakes to half a teaspoon per jar and add one whole dried Thai chili per jar for serious heat. You can also slice a fresh jalapeno and tuck two or three rounds alongside the pods for a bright, grassy heat rather than the dry heat of dried flakes.
Garlic dill pickled okra
This is the closest to classic Southern deli-style pickled okra. Increase to three garlic cloves per jar, use a fresh dill head rather than dried seed, and add a small piece of fresh dill frond tucked along the glass for visual appeal. The garlic mellows beautifully after a week and the dill perfumes the whole jar with a clean, herbal fragrance that you can smell the moment the lid pops.
How to serve pickled okra
Canned pickled okra is not just a snack you eat straight from the jar, though that is absolutely a valid life choice. Here are some of my favorite uses:
- Charcuterie and cheese boards as a tangy counterpoint to rich meats
- Chopped into potato salad for crunch and acidity in place of regular pickles
- Bloody Mary garnish, a classic Southern bar move that looks striking in the glass
- Alongside fried foods like our crispy coconut shrimp recipe where the acidity cuts the richness beautifully
- Sliced thin over rice bowls or grain salads for a punchy, pickled bite
If you love the idea of quick-pickled vegetables but want something ready in under an hour without water bath processing, our quick pickled red onions recipe delivers that same tangy punch with zero canning equipment.
Crispy pickled okra canning is also a wonderful gift. A jar with a handwritten label and a ribbon makes one of the most thoughtful homemade food gifts you can give, and it keeps for months on the recipient’s shelf without any refrigeration needed until they open it.
Frequently asked questions
Why is my pickled okra slimy after canning?
The most common cause is overprocessing or packing pods that were too large and overmature. Okra pods over four inches long have already started developing the thick mucilage that causes sliminess, and extended heat exposure activates it further. Stick to pods between two and four inches, cold-pack them raw without blanching, and process for exactly 10 minutes at a full boil.
Can I use apple cider vinegar instead of white vinegar?
Yes, as long as your apple cider vinegar is labeled at five percent acidity, which most commercial brands are. The flavor will be slightly softer and fruitier than white vinegar. Avoid raw, unfiltered apple cider vinegar with a visible mother culture because the acidity can be inconsistent, which matters for food safety in a water bath canning recipe.
How long do I wait before eating my canned pickled okra?
The minimum wait is 48 hours, but the flavor improves significantly after seven days and reaches its best point around two weeks. The brine needs time to fully penetrate the pods and develop its rounded, balanced flavor. Many canners label their jars with a “do not open until” date two weeks out to resist temptation.
Do I need to trim the stem ends of the okra pods?
Trim the stems to about a quarter inch above the cap rather than cutting them off flush. Leaving a short stub keeps the pod sealed so the brine flavors the exterior while maintaining some of the pod’s crunch. If you cut the stems off entirely, the interior of the pod is exposed and the okra tends to go soft faster during processing.
Conclusion
This ball canning recipe for pickled okra delivers exactly what that church potluck jar promised me years ago: snappy, garlicky, tangy pods that stay crisp from the moment you open the jar to the last bite. The cold-pack method, the precise brine ratio, and careful pod selection are what separate a great batch from a disappointing one.
Give it a try this weekend while summer okra is still at the farmers market. A single afternoon of canning will stock your pantry with six beautiful jars to enjoy all winter long.
For more recipes like this ball canning recipe for pickled okra, follow us on Facebook and Pinterest for home canning and preserved pantry inspiration.