The best blackberry jam I ever tasted came from a dented mason jar with no label, pressed into my hands by a neighbor who grew her berries along a chain-link fence and refused to measure anything.

Most store-bought versions taste flat and overly sweet, and many homemade recipes bury you in pectin packets and candy thermometers. This recipe skips all of that and lets the berries do the work.
This guide covers how natural pectin in blackberries sets the jam on its own, why cooking time matters more than any additive, and how to adjust sweetness based on your berry batch.
Table of Contents
Why blackberries don’t need pectin (and what happens when you cook them right)
Here’s the truth most jam recipes skip: blackberries are naturally high in pectin, particularly when some berries in the batch are slightly underripe. That natural pectin, combined with the acid already present in the fruit, causes the jam to set without any commercial additive. Commercial pectin is a convenience tool, not a necessity, and skipping it actually gives you a more honest, fruit-forward result.
The science behind the set
When you cook blackberries with sugar and lemon juice, three things happen at once. The heat breaks down the cell walls and releases the fruit’s natural pectin. The lemon juice lowers the pH, which helps pectin molecules bond more effectively. The sugar binds water, concentrating everything into that thick, spoonable texture you want.
The gel point is 220°F at sea level, which is exactly 8°F above the boiling point of water. If you live at higher altitude, the boiling point drops, so your gel point drops with it. A simple plate test is more reliable than any thermometer at altitude: spoon a small amount of jam onto a chilled plate, wait 30 seconds, then push it with your finger. If it wrinkles and holds its shape, you’re done. If it flows back together, cook for another two to three minutes and test again.
Why the sugar ratio matters
The standard ratio for no-pectin blackberry jam is roughly 1 cup of sugar for every 2 cups of crushed fruit. Going lower than that risks a softer set and shorter shelf life. Going higher pushes the jam into candy territory where the blackberry flavor gets muted. Taste your berries before you start. Wild or very ripe blackberries are sweeter, so you might pull back by 2 tablespoons. Tart, slightly underripe berries benefit from the full measure.
Lemon juice does double duty. It adds brightness that keeps the jam from tasting flat, and it provides the acid boost that supports gelling. Use fresh lemon juice rather than bottled. The difference in flavor is noticeable in something as simple as jam.
One more thing: don’t rush the cook. A rolling boil that you can’t stir down is what you’re after, and that usually takes 12 to 15 minutes after the sugar dissolves. Stir constantly during this phase to prevent scorching on the bottom and ensure even reduction. The jam will look thin and bubbly at first, then gradually deepen in color and thicken. That color shift from bright purple to a deeper, almost wine-dark red tells you concentration is happening.
If you enjoy making fruit preserves from scratch, our rhubarb strawberry jam uses a similar no-fuss approach with equally good results.
Print
Homemade Blackberry Jam Without Pectin: Rich, Jammy, and Done in 35 Minutes
- Total Time: 35 min
- Yield: 20 servings 1x
- Diet: Vegan
Description
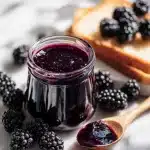
A simple, no-pectin blackberry jam made with just four ingredients. The berries cook down into a thick, glossy spread with a deep, fruity flavor in about 35 minutes. Great on toast, stirred into yogurt, or used as a glaze for roasted meats.
Ingredients
For the jam:
4 cups fresh or thawed frozen blackberries
2 cups granulated sugar
2 tablespoons fresh lemon juice (about 1 large lemon)
1/4 teaspoon fine sea salt
Instructions
1. Place a small ceramic plate in the freezer. This is your gel-testing plate and it needs to be very cold before you check the set.
2. Add the blackberries to a large, heavy-bottomed saucepan over medium heat. Use a potato masher or the back of a wooden spoon to crush the berries into a rough, uneven mash as they warm. Cook for 3 to 4 minutes until the berries are fully broken down and beginning to bubble, with some whole berry pieces still visible.
3. Add the sugar, lemon juice, and salt. Stir constantly until the sugar dissolves completely, about 2 to 3 minutes. The mixture will bubble steadily and begin to smell like warm, sweet fruit.
4. Increase the heat to medium-high and bring the jam to a full rolling boil, one that continues to bubble vigorously even when you stir. Stir frequently and scrape the bottom of the pan to prevent scorching.
5. Cook at a rolling boil for 12 to 15 minutes, stirring every 30 seconds. Watch for the color to deepen to a dark burgundy and the bubbles to become smaller, thicker, and slower. These are signs the jam is concentrating.
6. Test for the gel point: pull the cold plate from the freezer and drop a small spoonful of jam onto it. Wait 30 seconds, then push the jam gently with your fingertip. If it wrinkles and holds in place, the jam is set. If it flows back together, return the pan to the heat for 2 more minutes and test again.
7. Remove the pan from heat. Skim any foam from the surface with a spoon. Stir in an optional 1/2 teaspoon of unsalted butter to help reduce remaining foam.
8. Ladle the hot jam into clean jars, leaving 1/4 inch of headspace. Let cool completely at room temperature, then seal and refrigerate. For water-bath canning, process sealed jars in boiling water for 10 minutes.
Notes
Store sealed jars in the refrigerator for up to 3 weeks, or freeze in freezer-safe containers for up to 12 months. For shelf-stable storage, water-bath can the jam and keep for up to 1 year in a cool, dark place.
If your jam is softer than you’d like after cooling, it likely needed 2 to 3 more minutes of cooking. You can return it to the saucepan, bring it back to a boil, and cook briefly, then rejar.
Use a mix of fully ripe and slightly underripe blackberries if you can. The underripe ones are higher in natural pectin and help the jam set more firmly without any additive.
Frozen blackberries work just as well as fresh. Thaw them in a colander over a bowl and add all released juice to the pot along with the fruit.
- Prep Time: 15 min
- Cook Time: 20 min
- Category: Condiment, Snack
- Method: Stovetop
- Cuisine: American
Nutrition
- Serving Size: 1 tablespoon
- Calories: 85 kcal
- Sugar: 19 g
- Sodium: 15 mg
- Fat: 0 g
- Saturated Fat: 0 g
- Unsaturated Fat: 0 g
- Trans Fat: 0 g
- Carbohydrates: 21 g
- Fiber: 1 g
- Protein: 0 g
- Cholesterol: 0 mg
Choosing your blackberries and prepping them properly
The quality of your blackberry jam lives and dies with the berries you start with. Fresh, in-season blackberries picked at peak ripeness give you the deepest flavor. But frozen blackberries work beautifully too, which means you can make this jam year-round without sacrificing much.
Fresh vs. frozen blackberries
Fresh blackberries should be plump, fully black (not red-tinged), and smell faintly sweet and floral at room temperature. Avoid any that are mushy or leaking juice, since overripe berries have already lost some of their natural pectin.
Frozen blackberries are typically frozen at peak ripeness, so they often have excellent flavor. Thaw them in a colander set over a bowl, and add any released juice to the pot along with the berries. That liquid is concentrated blackberry flavor and you don’t want to lose it.
To strain or not to strain
Home jam makers split into camps on this one. Blackberry jam with seeds has a more rustic, old-fashioned character and takes less time to make. Strained jam is smoother and spreads more cleanly, but you’ll pass the cooked mixture through a fine mesh sieve or food mill, which adds a step and reduces your yield slightly.
For this recipe, I keep the seeds in. The seeds carry texture that reminds you this is real fruit, not a commercial spread. If you’re spreading the jam on buttered toast or spooning it over yogurt, seeds are barely noticeable. If you’re using it as a filling for a tart or layering it in a cake, you may prefer to strain it.
If straining, press the cooked jam through a fine mesh sieve using the back of a spoon. Work in batches and don’t skip the pressing step, or you’ll waste a significant amount of jam.
Do you need to sterilize jars?
If you plan to water-bath can this jam for shelf-stable storage, yes, absolutely sterilize your jars. Run them through a hot dishwasher cycle or simmer them in boiling water for 10 minutes. If you’re making a small batch to keep in the refrigerator and use within three weeks, clean jars straight from the dishwasher are fine.
This recipe makes approximately 20 servings, which fills about two standard 8-ounce mason jars. Scale up or down as needed. Doubling the recipe works, but cook in two separate batches rather than one large one. A bigger volume takes longer to reduce evenly and can make hitting the gel point unpredictable.
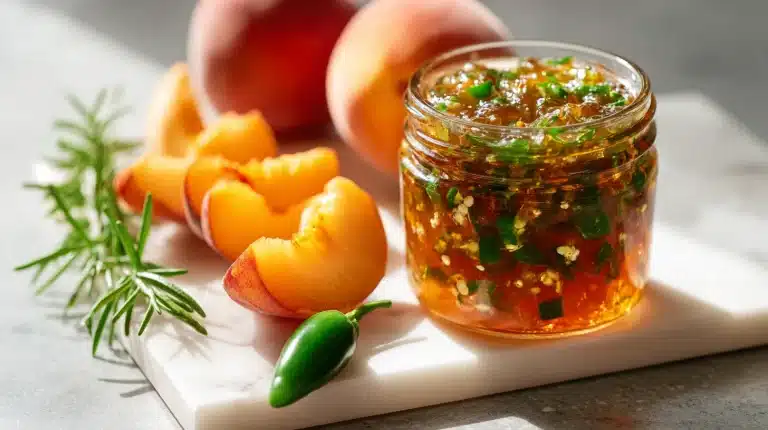
Our peach jam follows the same small-batch philosophy and is worth bookmarking for stone fruit season.
Step-by-step: How to make easy blackberry jam at home
This easy blackberry jam recipe comes together in about 35 minutes from start to finish. You need one heavy-bottomed saucepan, a wooden spoon, a few mason jars, and your ingredients. That’s it.
What you’ll need
- 4 cups fresh or thawed frozen blackberries
- 2 cups granulated sugar
- 2 tablespoons fresh lemon juice
- 1/4 teaspoon fine sea salt
The salt is optional but worth adding. It rounds out the sweetness and sharpens the berry flavor in a way that’s subtle but noticeable once you’ve tried it.
The cooking method, step by step
Start by placing a small ceramic plate in your freezer. You’ll use it for the gel test later.
Add the blackberries to your saucepan over medium heat. Use a potato masher or the back of your spoon to crush them as they warm up. You want a rough, uneven mash rather than a smooth puree. Some whole berry pieces suspended in the jam is a good thing.
Once the berries are broken down and bubbling, add the sugar and lemon juice. Stir constantly until the sugar dissolves completely, about two to three minutes. You’ll hear the mixture change from a low bubble to a more aggressive rolling boil. That shift in sound tells you the water is evaporating and the concentration is beginning.
Increase the heat to medium-high and bring the mixture to a full rolling boil, one that keeps churning even when you stir. Cook for 12 to 15 minutes, stirring frequently and scraping the bottom of the pan to prevent sticking. The jam will rise dramatically in the pot at first, so make sure your saucepan is large enough to handle it.
Watch for two visual cues: the color deepening to a dark burgundy, and the bubbles becoming smaller, thicker, and slower. When both happen, pull the chilled plate from the freezer and drop a small spoonful of jam on it. Wait 30 seconds. Push it with your fingertip. If it wrinkles and stays in place, the jam is set. If it flows, cook for another two minutes and test again.
Remove from heat, skim off any foam from the surface (a spoonful of butter stirred in at this stage helps reduce foam), and ladle into clean jars. Let cool completely at room temperature before sealing and refrigerating.
That warm, just-poured jam smells like concentrated summer: deep berry sweetness with a faint tartness and something almost floral underneath. It’s a good smell to have filling your kitchen.
If you love working blackberries into baked goods too, our blackberry lime sourdough bread is a natural next step.
Storing, using, and serving your blackberry jam
Once you have a jar of homemade blackberry jam in your refrigerator, it tends to disappear faster than you expect. But knowing how to store it properly keeps it at its best, and knowing all the ways you can use it makes a small batch feel like a much larger reward.
Storage guidelines
Refrigerator: keeps for up to three weeks in a sealed jar. The flavor actually deepens slightly after day two, once the jam has had time to settle and the fruit and sugar have fully merged.
Freezer: pour into freezer-safe containers leaving half an inch of headspace, and freeze for up to one year. Thaw overnight in the refrigerator.
Water-bath canning: process sealed jars in boiling water for 10 minutes. Properly canned jars are shelf-stable for up to one year. Always check the seal before opening a stored jar. The lid should not flex up and down when pressed.
Ways to use homemade blackberry jam
The obvious use is toast, and it’s obvious for good reason. A thick smear of this jam on buttered sourdough is one of those small things that genuinely improves a morning.
Beyond toast, here are some ways this jam earns its keep in the kitchen:
- Swirl into plain yogurt or cottage cheese for a quick breakfast
- Layer inside thumbprint cookies or sandwich cookies
- Use as a glaze for roasted pork tenderloin or duck breast, thinned slightly with balsamic vinegar
- Spread between cake layers instead of frosting
- Stir into oatmeal with a handful of toasted walnuts
- Spoon over brie or cream cheese on a cheese board
- Use as a base for a pan sauce for lamb chops
The savory applications are genuinely underrated. Blackberry jam has enough acidity and depth to work with rich meats the same way cranberry sauce does with turkey. If you want to try something unexpected, our bacon blackberry cheesecake burger uses a similar berry element to great effect.
Making a larger batch for canning
If you want to make enough blackberry jam to give as gifts or stock your pantry, scale the recipe up in batches of four cups of berries at a time rather than cooking a massive single batch. Each batch takes the same 35 minutes, and the results are consistent. Larger batches are harder to bring to the gel point evenly, and the risk of scorching increases significantly.
Label your jars with the date you made them. Blackberry jam looks nearly identical across different batches but the flavor can shift based on berry sweetness. A little masking tape label with the date and a note about sweetness level saves you guessing later.
Frequently asked questions
Can I make blackberry jam without pectin and still get a firm set?
Yes. Blackberries contain enough natural pectin to set a jam without any commercial additive, as long as you cook the mixture to the gel point of 220°F. The plate test is the most reliable way to check: a chilled spoonful should wrinkle and hold when nudged. If your jam turns out softer than expected, it likely needed two to three more minutes of cooking.
How do I know if my blackberry jam has gone bad?
Look for mold, an off smell, or a lid that flexes when pressed (for canned jars). Refrigerated jam should be used within three weeks. If the color has turned brownish-grey or the jam smells fermented rather than fruity, discard it. When in doubt, throw it out.
Can I use this recipe for water-bath canning?
Yes. Ladle the hot jam into sterilized jars, leave 1/4 inch of headspace, wipe the rims clean, and process in a boiling water bath for 10 minutes. Always use jars and lids specifically designed for canning, and check that each seal is firm before storing. Properly canned jars are shelf-stable for up to one year.
Can I reduce the sugar in this blackberry jam recipe?
You can reduce the sugar slightly, but going below 1.5 cups for every 4 cups of berries risks a looser set and shorter shelf life. Sugar is not just sweetener here; it also acts as a preservative and helps the jam gel. If you want a lower-sugar option, consider making a small refrigerator batch and using it within one to two weeks rather than canning it.
Conclusion
Homemade blackberry jam is one of those recipes that rewards the small investment of time with something that feels genuinely special every time you open a jar. The berries do most of the work. Your job is to cook them long enough, check the set, and then get out of the way.
Give this recipe a try on your next slow morning or weekend afternoon when you have 35 minutes and a basket of berries looking for a purpose.
For more recipes like blackberry jam, follow us on Facebook and Pinterest for seasonal preserving ideas and easy homemade condiment recipes.