My grandmother kept an Amish Sourdough Starter on her kitchen counter for decades, a bubbling jar of sweet, milky batter that seemed to multiply on its own every ten days. It smelled like warm yeast, fresh milk, and caramelized sugar. I remember being a kid and thinking the jar was alive. It sort of is.

If you have ever struggled with a dry, overly sour sourdough loaf that refuses to rise, this sweet bread friendship starter solves that exact frustration. By adding a little sugar, milk, and active dry yeast, you get a bubbly, reliable starter that bakes into soft, tender loaves every single time. No fussy temperature control. No praying to the wild yeast gods. Just a jar of sweet batter that does what you ask it to.
Coming up: how to create and feed your Amish starter culture, the ten-day cycle you need to follow, and the biggest mistakes to avoid so your jar stays alive.
Table of Contents
The heritage of Amish Friendship Bread
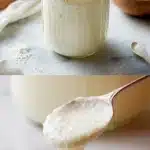
There is something comforting about a jar of Amish Sourdough Starter sitting on your kitchen counter. I think it is the sound. You walk past it, and you hear faint little pops from inside the jar. Unlike a traditional wild yeast sourdough starter, which captures unpredictable yeast from the air, the Amish friendship bread starter relies on a careful blend of active dry yeast, warm water, milk, sugar, and all-purpose flour. This combination creates a distinctly sweet sourdough starter that yields soft, pillowy bread with a mild, tangy flavor rather than a sharp, acidic bite. The history of this Amish starter culture is rooted in community and sharing, which is why it is often called a friendship bread starter. You bake with it, and then you pass portions of the living batter to friends and neighbors so they can start their own jars. It is a chain letter of baked goods, but one that actually delivers warm bread to your door.
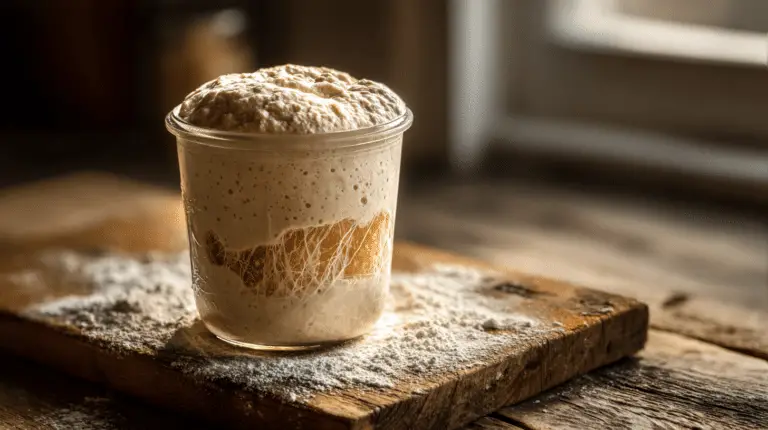
When you maintain an Amish Sourdough Starter, you are participating in a cycle of feeding and resting that spans ten days. On the first day, you combine your yeast, warm water, flour, sugar, and milk into a thick, pale batter. Over the next several days, you simply stir the mixture once a day with a wooden spoon or silicone spatula. You will hear the faint popping of gas bubbles escaping the thick paste, and the aroma will shift from fresh yeast to a slightly tangy, sweet dairy smell. This daily interaction builds a rhythm in your kitchen. It asks very little of your time but rewards you with an active culture that is ready to bake into all sorts of treats. You can use this sweet starter to make pancakes, waffles, or quick breads, or you can stick to the classic cinnamon sugar loaf that made this recipe famous at church potlucks across the country.
The texture of a thriving Amish Sourdough Starter is unlike any other baking base. It should be thick and tacky, clinging to your spoon before slowly dropping back into the bowl. If your starter looks runny or smells aggressively like acetone or alcohol, it is hungry and needs a feeding. The sugar in this recipe is immediate food for the yeast, giving the culture a rapid burst of carbon dioxide that aerates the batter. The milk adds fat and protein, which tenderizes the gluten strands in the flour and creates a softer crumb when you finally bake your dough. Whether you are a seasoned baker or a beginner looking for a reliable entry point into bread making, an Amish friendship bread starter is a forgiving foundation. For more on wild yeast alternatives, you can explore this sourdough starter recipe, but this Amish variation remains my personal favorite. I keep coming back to it because it is just so forgiving. It tolerates neglect. It bakes into sweet, tender bread. What more do you want?
Print
Amish Sourdough Starter: The Sweet Bread Friendship Recipe
- Total Time: 14415 min
- Yield: 1 jar servings 1x
Description
A sweet and reliable starter culture made with active dry yeast, milk, and sugar. This Amish Sourdough Starter ferments over ten days to create a bubbly base for soft breads, cakes, and pancakes.
Ingredients
For the starter:
1 packet active dry yeast (2 1/4 teaspoons)
1/4 cup warm water (110 degrees Fahrenheit)
1 cup all-purpose flour
1 cup granulated white sugar
1 cup whole milk (or 2 percent milk)
For the day 5 feeding:
1 cup all-purpose flour
1 cup granulated white sugar
1 cup whole milk
For the day 10 feeding:
1 cup all-purpose flour
1 cup granulated white sugar
1 cup whole milk
Instructions
1. Dissolve the active dry yeast in warm water in a large glass bowl and let it sit for 5 minutes until it foams and smells like fresh bread.
2. Whisk in the all-purpose flour, granulated sugar, and whole milk until the mixture forms a thick, smooth, pale yellow batter with no dry lumps.
3. Pour the batter into a large glass jar, cover it loosely with a clean kitchen towel, and leave it on your kitchen counter at room temperature.
4. Stir the mixture once a day on days 2, 3, and 4 using a wooden spoon, listening for the faint pop of gas bubbles escaping the thick paste.
5. On day 5, feed the starter by adding 1 cup of flour, 1 cup of sugar, and 1 cup of milk, then stir vigorously to incorporate plenty of air.
6. Continue stirring the mixture once a day on days 6, 7, 8, and 9, noticing the deeper, sweeter, and slightly tangy aroma developing in the jar.
7. On day 10, feed the starter again with 1 cup of flour, 1 cup of sugar, and 1 cup of milk, stirring well until fully combined.
8. Divide the bubbly starter into portions, keeping one to bake immediately, one to maintain your culture, and giving the rest away to friends.
Notes
Store the starter in a loosely covered glass jar on your kitchen counter at room temperature. Never use a metal container or seal the jar tightly.
If you need a break from the ten-day cycle, store the jar in the refrigerator and feed it once a week with 1 cup each of flour, sugar, and milk.
Use a wooden or silicone spoon to stir the starter, as metal utensils can react with the acidic fermentation process.
You can halve the feeding amounts if you want to maintain a smaller jar of starter without producing excess batter.
- Prep Time: 15 min
- Rest Time: 14400 min
- Cook Time: 0 min
- Category: Breakfast
- Method: No-Cook
- Cuisine: American
Nutrition
- Serving Size: 1 jar
- Calories: 1204 kcal
- Sugar: 239 g
- Sodium: 160 mg
- Fat: 8 g
- Saturated Fat: 5 g
- Unsaturated Fat: 3 g
- Trans Fat: 0 g
- Carbohydrates: 248 g
- Fiber: 7 g
- Protein: 24 g
- Cholesterol: 24 mg
How to create your Amish starter culture
Creating an Amish Sourdough Starter from scratch takes only fifteen minutes of active prep time, but it requires patience over a ten-day fermentation period. You begin by proofing your active dry yeast in a bowl of warm water. The water should feel like a warm bath, around 110 degrees Fahrenheit, to wake up the yeast without killing it. Once the yeast foams and smells distinctly of fresh baked bread, you whisk in all-purpose flour, white granulated sugar, and milk. Whole milk or 2 percent milk works beautifully here because the milk fat coats the flour proteins, keeping the final baked goods tender and moist. Pour this pale, thick batter into a large glass jar or a non-reactive bowl, cover it loosely with a clean kitchen towel or plastic wrap, and leave it on your kitchen counter at room temperature. Over the first few days, you will notice the batter expanding and forming tiny bubbles on the surface.
The daily maintenance of your Amish Sourdough Starter is surprisingly simple. On days two through four, you only need to stir the mixture once a day. Use a wooden spoon, as metal can sometimes react with the acidic environment of fermenting batter, though a sturdy silicone spatula works perfectly fine too. As you stir, you will notice a slightly sour, sweet milk aroma rising from the jar. The batter might separate slightly, with a thin layer of liquid pooling at the top. This separation is entirely normal for a sweet sourdough starter. The liquid is just water separating from the heavier flour and milk solids as the yeast consumes the starches. A quick, thorough stir brings everything back together into a smooth, cohesive paste.
On day five, you feed the starter. Feeding means adding one cup each of flour, sugar, and milk to the jar and stirring vigorously to incorporate plenty of air. This fresh injection of food wakes the yeast up, and within hours, you will see the batter bubble and expand again. The smell will deepen, becoming richer and sweeter, almost like a yeasty pancake batter. By day ten, your Amish Sourdough Starter is fully mature and ready to bake with. You will add another cup each of flour, sugar, and milk, stir it one last time, and then divide the batter. You keep one portion to bake immediately, one portion to continue feeding as your ongoing starter, and the remaining portions to give away to friends. If you are looking for a chocolate twist on this classic technique, you might enjoy this chocolate sourdough starter recipe, which uses a similar feeding method for a rich, dark batter.
Baking with your sweet sourdough starter
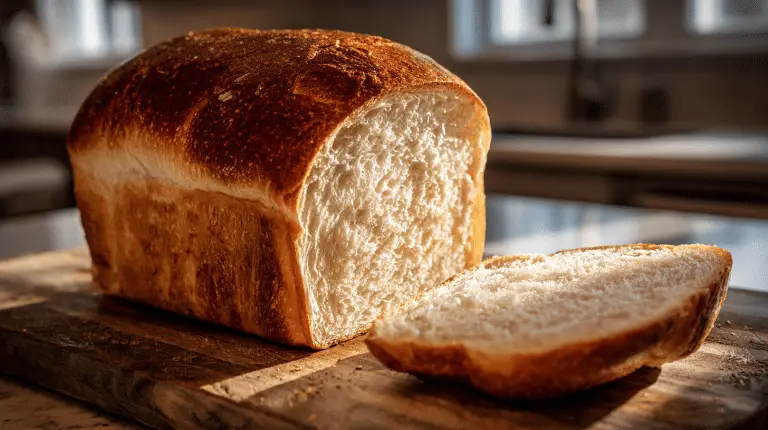
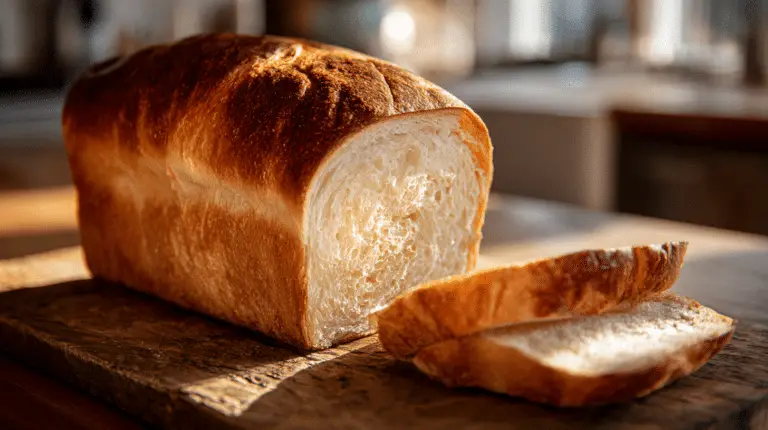
Once your Amish Sourdough Starter reaches day ten, the real fun begins. This sweet sourdough starter is versatile and bakes into some of the most tender, moist breads you will ever taste. The most iconic use is the classic Amish Friendship Bread, which takes a portion of your active starter and combines it with oil, eggs, more flour, more sugar, and a generous dash of cinnamon. The resulting batter bakes into a dense, moist loaf with a crackly cinnamon sugar crust that snaps slightly under your teeth before giving way to a soft, tender crumb. The slight tang from the fermented starter balances the heavy sweetness of the sugar and the warmth of the cinnamon. Your kitchen will smell incredible while this bread bakes. I mean it. Caramelized sugar and toasted spice, right there in the air. It is the kind of smell that makes neighbors knock.
Beyond the classic loaf, you can use your Amish Sourdough Starter to make all sorts of baked goods. Because the starter contains milk and sugar, it naturally leans toward sweeter recipes. You can stir a cup of the starter into your morning pancake batter for a fluffy stack of flapjacks with a subtle tangy depth. You can also fold it into muffin batter, coffee cakes, or quick breads. The yeast in the starter is a mild leavening agent, giving baked goods a slight lift and a wonderfully chewy texture. If you find yourself with extra starter that you cannot bake with immediately, remember that the discard from this Amish starter culture is just as useful as the active starter. You can use the unfed discard to make sourdough discard banana bread, which stays moist for days.
When baking with an Amish friendship bread starter, you need to consider the additional sugar and liquid it brings to your recipe. Because the starter is already sweet and slightly thinner than a stiff wild yeast starter, it works best in recipes that call for a high hydration dough or a pourable batter. If you try to use it in a traditional lean bread dough that only contains flour, water, and salt, the milk and sugar in the starter will burn quickly in a hot oven and the dough will ferment too rapidly. Stick to enriched doughs and batter breads to get the best results. The fat from the milk and the acid from the fermentation process work together to strengthen the gluten network while keeping the crumb soft. Your baked goods will stay fresh on the counter for several days, wrapped tightly in plastic wrap, because the moisture from the starter keeps the texture tender.
Maintaining and sharing your friendship starter
The beauty of an Amish Sourdough Starter is that it is designed to be shared. At the end of your ten-day cycle, you will have enough starter to bake a loaf, keep a portion for yourself, and give away two or three portions to friends and family. Sharing the starter is half the fun. You simply pour a cup of the batter into a clean jar, seal it tightly, and pass it along with a copy of the feeding and baking instructions. If you receive a jar of friendship bread starter from a neighbor, you begin your cycle on day one of the instructions, feeding it on day five and baking on day ten. It creates a continuous loop of baking and community building. The sweet, milky batter is much more forgiving than a wild yeast starter, making it an excellent gift for novice bakers who might feel intimidated by traditional bread making. I gave a jar to my sister last year. She had never baked bread in her life. Three months later she was bringing me loaves.
If you cannot find someone to take your extra starter, you have a few options. You can simply pour the excess down the drain, though that feels like a waste of good baking potential. A better option is to freeze the extra portions. The yeast in an Amish Sourdough Starter goes dormant in the freezer, preserving the culture indefinitely. When you want to use it, you thaw the jar in the refrigerator overnight, bring it to room temperature on the counter, and give it a feeding to wake the yeast back up. You can also adjust the recipe scale if you do not want to end up with so much starter. Instead of feeding the starter a full cup of flour, sugar, and milk on day five and day ten, you can feed it half a cup of each ingredient. This will keep your jar manageable while still maintaining an active Amish starter culture.
Maintaining your starter long-term requires a regular routine. If you want to keep your Amish Sourdough Starter going indefinitely, you simply repeat the ten-day cycle of stirring, feeding, and baking. However, if you need a break from baking, you can store the jar in the refrigerator. The cold temperature slows down the fermentation process significantly, meaning you only need to feed the starter once a week instead of following the daily counter routine. When you are ready to bake again, bring the jar back to room temperature, give it a feeding, and let it bubble up before using it in your favorite sourdough discard dinner rolls or sweet cinnamon bread. The starter might look slightly lethargic after a long cold nap, but a fresh dose of flour, sugar, and milk will revive it completely, bringing back that comforting, sweet aroma to your kitchen.
Frequently asked questions
What is the difference between Amish bread starter and sourdough starter?
An Amish Sourdough Starter uses commercial active dry yeast, milk, and sugar to create a sweet, reliable fermentation, while a traditional sourdough starter relies on wild yeast captured from the air using only flour and water. The Amish starter produces a much milder, sweeter flavor and yields a softer, more tender crumb, making it ideal for enriched, cake-like breads.
How to make an Amish sourdough starter?
To make an Amish sourdough starter, you dissolve active dry yeast in warm water, then whisk in all-purpose flour, sugar, and milk. You cover the mixture loosely and let it sit on your counter for ten days, stirring it daily and feeding it with equal parts flour, sugar, and milk on day five to keep the yeast active and bubbling.
What is the biggest mistake you can make with your sourdough starter?
The biggest mistake you can make with an Amish Sourdough Starter is using a metal container or tightly sealing the jar with a metal lid. The acidic environment of the fermenting starter reacts with metal, which can ruin the flavor and kill the yeast. Always use a glass jar, a plastic container, or a ceramic bowl, and cover it loosely with a towel or plastic wrap.
Does Amish bread starter need to be refrigerated?
Amish bread starter does not need to be refrigerated during the ten-day activation and baking cycle. It thrives at room temperature on your kitchen counter. However, if you need to pause the cycle or take a break from baking, you can store the starter in the refrigerator to slow down fermentation and reduce the frequency of feedings.
Conclusion
An Amish Sourdough Starter is one of those recipes that becomes part of your routine before you even notice it happening. Flour, sugar, milk, and yeast. That is all it takes to create a living culture that bakes into tender, sweet loaves. My grandmother kept hers going for decades. I think you will want to do the same once you taste the bread.
For more recipes like Amish Sourdough Starter, follow us on Facebook and Pinterest for cozy casserole inspiration and weeknight baking ideas.