The first time I bit into a watermelon popsicle at a street market in Austin, I thought someone had frozen summer itself and handed it to me on a stick.

Most homemade frozen pops turn out either icy and grainy or so sweet they taste like candy. This recipe fixes both problems by leaning on the natural sugar in ripe seedless watermelon and adding a squeeze of lime to keep the flavor bright and clean.
This guide covers how to pick the ripest watermelon, why your pops might separate in the mold and exactly how to stop it, and a simple flavor variation that takes the base recipe from great to genuinely memorable.
Table of Contents
Why this watermelon popsicle recipe actually works
Walk into any grocery store in July and you’ll see shelves of neon-colored frozen pops loaded with corn syrup and artificial flavor. They’re fine, but they don’t taste like fruit. They taste like the idea of fruit, filtered through a chemistry lab.
A homemade watermelon popsicle made with real, ripe watermelon is completely different. The flesh of a good seedless watermelon is around 92 percent water, which means it blends into a smooth, pourable juice with almost no effort. That high water content also gives the finished pop its clean, refreshing bite instead of the heavy, chewy texture you sometimes get with cream-based pops.
The lime juice does more work than it looks like. Yes, it adds brightness, but it also acts as a flavor amplifier. Watermelon on its own can taste a little flat once frozen because cold temperatures suppress your ability to perceive sweetness. A tablespoon or two of fresh lime juice wakes everything back up, so the pop tastes as lively frozen as it does fresh off the knife.
Fresh mint is optional here, but I’d encourage you to try it at least once. Blend three or four mint leaves directly into the watermelon mixture and you’ll get a cooling menthol note that makes the whole pop feel ten degrees colder than it actually is. It’s a small addition with an outsized effect.
The sweetener question
If your watermelon is genuinely ripe and sweet, you won’t need any added sweetener at all. Taste your blended juice before you pour it into the molds. If it tastes good enough to drink as a glass of juice, it will taste good frozen.
If it needs a little help, a teaspoon of honey or agave syrup blended directly into the mixture is all you need. Avoid granulated sugar here because it doesn’t dissolve evenly in cold liquid and can leave a slightly gritty finish in the final pop.
If you love honey-forward flavors in your recipes, the honey trick recipe on Forkful Daily is worth a look for other creative ways to use it as a natural sweetener.
One last thing: this recipe is naturally vegan, gluten-free, and contains no added sugar if you skip the optional sweetener. It’s also one of the easier items from our collection of easy summer meals 25 bold fast recipes ready in 35 minutes or less, since active prep takes less than ten minutes.
Print
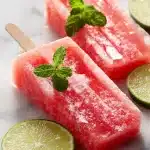
Watermelon Popsicle: The 3-Ingredient Frozen Treat You’ll Make All Summer
- Total Time: 308 min
- Yield: 7 popsicles 1x
- Diet: Vegan
Description
These easy homemade watermelon popsicles are made with just three ingredients: fresh seedless watermelon, lime juice, and optional mint. They have no added sugar, freeze up smooth and bright, and take less than 10 minutes of active prep time. A squeeze of lime keeps the flavor lively even straight from the freezer.
Ingredients
For the popsicles:
6 cups seedless watermelon (cubed, seeds removed if any)
2 tablespoons fresh lime juice (from about 1 large lime)
3 to 4 fresh mint leaves (optional)
Optional add-ins:
1 teaspoon honey or agave syrup (only if watermelon needs sweetening)
1 small pinch fine sea salt
Instructions
1. Cut the watermelon into rough chunks and add them to a blender. Remove any seeds you find. The chunks should smell sweet and deeply fruity when you cut them.
2. Add the lime juice and mint leaves if using. Blend on high for about 30 seconds until the mixture is completely smooth and looks like a bright pink-red juice with a slight froth on top.
3. Taste the blended mixture. If it needs sweetness, add honey or agave and blend for another 10 seconds. Add a small pinch of fine sea salt to sharpen the flavor.
4. Pour the mixture slowly into 7 standard popsicle molds, filling each to about a quarter inch from the top. Tap the molds gently on the counter to release any air bubbles trapped inside.
5. Stir each mold gently with a popsicle stick to redistribute the fruit solids, then insert the sticks so they stand centered and upright.
6. Place the molds in the freezer on a flat, level surface. Freeze for at least 5 hours or overnight until the pops are completely solid and feel firm all the way through when pressed.
7. To release the pops, run warm water over the outside of the mold for 15 to 20 seconds. You will feel a slight give when the pop loosens. Pull gently and the pop should slide out cleanly.
8. Serve immediately or wrap each pop in a small piece of parchment paper and store in a zip-top freezer bag for up to 3 weeks.
Notes
Store wrapped pops in a zip-top freezer bag for up to 3 weeks. There is no need to refrigerate them before serving; serve directly from the freezer.
If your pops separate into layers during freezing, stir each mold gently with the stick right after pouring, or pre-freeze the mixture for 30 minutes until it starts to thicken, then stir once more before inserting sticks and finishing the freeze.
For a tajin variation, press the freshly unmolded pop into a shallow dish of tajin seasoning for a chili-lime crust on the outside.
If using a seeded watermelon variety, blend as normal and strain the mixture through a fine mesh strainer before pouring into molds to remove seeds and any stringy pulp.
- Prep Time: 8 min
- Rest Time: 300 min
- Cook Time: 0 min
- Category: Dessert
- Method: No-Cook
- Cuisine: American
Nutrition
- Serving Size: 1 popsicle
- Calories: 28 kcal
- Sugar: 6 g
- Sodium: 12 mg
- Fat: 0 g
- Saturated Fat: 0 g
- Unsaturated Fat: 0 g
- Trans Fat: 0 g
- Carbohydrates: 7 g
- Fiber: 0 g
- Protein: 1 g
- Cholesterol: 0 mg
How to choose a watermelon worth freezing
The flavor of your finished watermelon ice pops is decided almost entirely at the grocery store or farmers market, before you’ve touched your blender. Start with a mediocre watermelon and no amount of lime juice will save you. Start with a great one and the recipe practically makes itself.
Here’s what to look for:
- The field spot: Turn the watermelon over. A creamy yellow or orange patch on the underside means it sat on the ground and ripened in the sun. A white or pale green patch means it was picked too early.
- The thump test: Knock on the watermelon with your knuckles. A ripe one sounds hollow and deep, like knocking on a door. An underripe one sounds dense and dull, like knocking on a countertop.
- Weight: Pick up two melons of similar size and choose the heavier one. More weight means more water content, which means sweeter, juicier flesh.
- The dried stem: If the little curly tendril near the stem end has dried and turned brown, the melon ripened fully on the vine before it was cut. A green, fresh-looking tendril is a sign it was harvested too soon.
- Skin texture: Look for a dull, matte finish rather than a shiny surface. A shiny watermelon is often underripe.
At the farmers market, don’t be shy about asking the farmer when the melons were picked. Most are happy to point you toward the sweetest variety they have that week.
Seedless vs. seeded
Seedless watermelon is the obvious choice for a watermelon popsicle because you don’t have to fish out seeds before blending. But if you happen to have a seeded variety, just blend it as normal and pour the mixture through a fine mesh strainer before pouring into molds. The strainer catches seeds and any stringy bits of pulp, and you end up with a smoother, cleaner pop anyway.
Mini seedless watermelons, sometimes labeled “personal size,” are a good option if you’re only making one batch. They tend to be sweeter pound for pound than the large varieties, and you won’t be left with a half-used melon sitting in your refrigerator for a week.
Making homemade watermelon popsicles step by step
The process is genuinely simple: blend, taste, pour, freeze. But a few small details make the difference between pops that slide cleanly out of the mold and pops that stick, crack, or separate into watery layers.
The blend
Cut your seedless watermelon into rough chunks and add them to a blender. You don’t need to be precise here. Remove any large seeds if your watermelon has them. Add the lime juice and mint leaves if using, and blend on high for about 30 seconds until completely smooth. The mixture should look like a bright pink-red juice with a slight froth on top.
Taste it now. This is your only chance to adjust the flavor before it freezes. Add your sweetener if needed, a pinch of fine salt (it sharpens the sweetness), and blend for another ten seconds.
The pour
Pour the mixture slowly into your popsicle molds, leaving about a quarter inch of space at the top. The liquid expands slightly as it freezes and if you overfill the mold, you’ll end up with pops that are impossible to remove cleanly.
Tap the filled molds gently on your counter a few times to release any air bubbles trapped in the mixture. Insert your popsicle sticks and make sure they’re centered and upright.
The freeze
Place the molds in the freezer and leave them undisturbed for at least 5 hours. Overnight is better. The pops are ready when they feel completely solid and firm all the way through when you press on the top.
To release the pops, run warm water over the outside of the mold for about 15 to 20 seconds. You’ll hear and feel a slight give when the pop loosens. Pull gently and it should slide right out.
If you enjoy making fresh, fruit-forward things at home, you might also love this feta cucumber watermelon salad which uses the same summer produce in a completely different way.
Troubleshooting, storage, and fun variations
Why do my popsicles separate?
This is the most common frustration with homemade watermelon ice pops, and it has a simple explanation. Watermelon is mostly water. When you blend it and pour it straight into the mold, the heavier fruit solids can sink while the liquid rises. After several hours in the freezer, you end up with a pop that’s icy and clear on top and more concentrated and darker at the bottom.
The fix is easy. After pouring into the molds, stir each mold gently with your popsicle stick before inserting it and leaving it to freeze. This redistributes the solids. You can also freeze the mixture for about 30 minutes until it’s just starting to thicken, then stir again before inserting the sticks and finishing the freeze. Either method gives you an even color and texture all the way through.
Storage
Fresh watermelon popsicles keep well in the freezer for up to three weeks. Once they’re fully frozen and removed from the molds, wrap each one individually in a small piece of plastic wrap or parchment paper and store them in a zip-top freezer bag. This prevents them from sticking together and protects against freezer burn.
Variations worth trying
- Watermelon lime popsicles with tajin: Press the freshly unmolded pop into a shallow dish of tajin seasoning. The chili-lime salt crust is extraordinary against the sweet fruit.
- Watermelon coconut pops: Replace a quarter of the watermelon juice with full-fat coconut milk for a creamier, richer pop with a beautiful marbled effect if you swirl the two together instead of blending them fully.
- Watermelon lemonade pops: Swap the lime juice for fresh lemon juice and add a little lemon zest for a sharper, tangier result.
- Sparkling watermelon pops: Use sparkling water blended with your watermelon mixture for a slightly fizzy, lighter texture. Pour carefully to minimize foam.
For a frozen dessert in a completely different direction, the low carb vanilla protein jello recipe is another no-bake option that’s worth keeping in your summer rotation.
Frequently asked questions
How do I make watermelon popsicles?
Blend seedless watermelon chunks with fresh lime juice and optional mint until smooth. Pour the mixture into popsicle molds, insert sticks, and freeze for at least 5 hours until completely solid. Run the molds under warm water for 15 to 20 seconds to release the pops cleanly.
How do I choose a good watermelon for this recipe?
Look for a creamy yellow field spot on the underside, a hollow sound when tapped, and a dull matte skin rather than a shiny one. A heavier watermelon relative to its size means more juice and more sweetness, which is exactly what you want for popsicles.
Are watermelon popsicles healthy?
Yes, particularly when made without added sugar. Watermelon is low in calories, high in hydration, and contains lycopene and vitamin C. A single watermelon popsicle made from this recipe is roughly 20 to 30 calories depending on the size of your molds, making it one of the more reasonable frozen treats around.
What if my watermelon popsicles separate while freezing?
Separation happens when the heavier fruit solids sink before the mixture freezes solid. Stir each mold gently with the popsicle stick right after pouring, or pre-freeze the mixture for 30 minutes until it starts to thicken, stir once more, then insert the sticks and finish freezing. Both methods solve the problem completely.
Conclusion
There is something genuinely satisfying about making a watermelon popsicle at home and knowing exactly what went into it: ripe fruit, a squeeze of lime, maybe a few mint leaves. No dye, no syrup, no long ingredient list. Just the actual taste of summer on a stick.
Give this recipe a try this week while good watermelons are still easy to find. The prep takes less than ten minutes, and the payoff is a freezer full of cold, fruit-forward pops ready whenever the temperature climbs.
For more recipes like watermelon popsicles, follow us on Facebook and Pinterest for fresh summer treat ideas and seasonal recipe inspiration.