The quest for truly juicy pork chops usually ends with a dry, chewey disappointment on the dinner plate. I spent years overcooking pork until I finally learned the specific technique that changes everything.
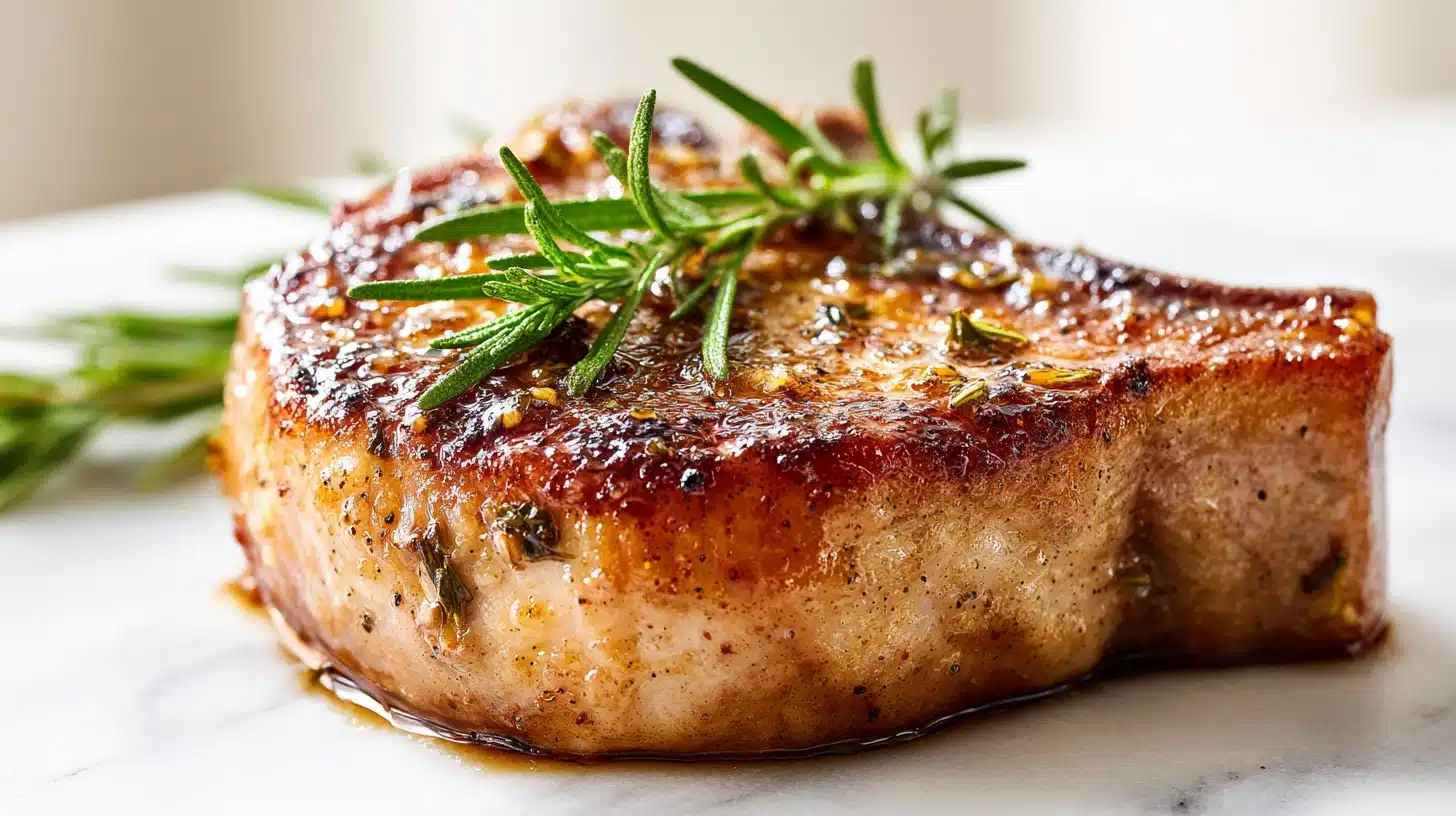
Most home cooks fear undercooking pork, leading to a tough, gummy texture that requires a steak knife to chew through. This recipe uses a rapid brown sugar brine and a cast iron sear to guarantee tender, moist pork chops every time.
By the end, you’ll know why a short brine beats overnight marinating, how to use a flour dusting for a better crust, and the exact internal temperature that saves the meat.
Table of Contents
The Secret to Tender Pork Chops: A Quick Brown Sugar Brine
Let’s talk about the most common reason your pork chops turn out dry. People fear pork. Decades of old cooking advice told us to cook pork until it was entirely white and well-done, which resulted in shoe-leather meat. The real secret to juicy pork chops is reversing that mindset and treating the meat with a little science before it ever hits the heat. A simple salt brine changes the cellular structure of the meat so it holds onto its natural juices instead of squeezing them out onto the hot pan. You do not need an overnight soaking session. A quick 30-minute rest in a simple brine solution does the heavy lifting for you.
To make this brine, you need warm water, kosher salt, and a little brown sugar. The salt works by denaturing the protein strands, which opens up pockets inside the meat that trap moisture. The brown sugar does two things. First, it cuts the harshness of the salt so the meat doesn’t taste purely savory. Second, it helps with caramelization when the meat hits the hot skillet. You get a dark, golden crust that makes your mouth water. This is the exact same reason we love the sticky sweetness in our garlic brown sugar pork tenderloin juicy glazed easy dinner, but adapted for a quick soak.
You want to use bone-in pork chops that are at least one inch thick for this method. Thin chops will overcook in the brine and turn mushy. Submerge your thick-cut chops in the warm brine, let them sit on the counter for exactly 13 minutes, and then pat them completely dry with paper towels. If you skip the drying step, the moisture on the exterior will turn to steam in the pan, ruining your chance at a deep, flavorful sear. This brief brining window is the difference between meat that releases a wave of juices when you cut into it and meat that leaves a dry white residue on your tongue. The pork will absorb just enough liquid to stay plump through the high heat of the cast iron skillet.
Print
Juicy Pork Chops (Quick Brine + Cast Iron)
- Total Time: 35 min
- Yield: 4 servings 1x
Description
These juicy pork chops use a quick brown sugar brine and a cast iron sear to lock in moisture, resulting in a tender, flavorful main course ready in thirty-five minutes.
Ingredients
For the brine:
4 bone-in pork chops (1 to 1.5 inches thick)
3 cups warm water
3 tablespoons kosher salt
2 tablespoons brown sugar
For the seasoning rub:
1 tablespoon olive oil
1 tablespoon all-purpose flour
1 teaspoon garlic powder
1 teaspoon smoked paprika
1/2 teaspoon black pepper
Instructions
1. Combine the warm water, kosher salt, and brown sugar in a large bowl, stirring until dissolved. Submerge the pork chops in the brine and let them sit at room temperature for 13 minutes.
2. Remove the chops from the brine and pat them completely dry with paper towels.
3. In a shallow dish, mix the flour, garlic powder, smoked paprika, and black pepper. Dredge both sides of each chop in the mixture, shaking off the excess.
4. Preheat your oven to 400 degrees. Heat a cast-iron skillet over medium-high heat and add the olive oil.
5. Place the chops in the hot skillet and sear undisturbed for 3 minutes until a dark golden crust forms. Flip and sear the other side for 2 minutes.
6. Transfer the skillet directly to the oven and bake for 8 minutes.
7. Check the internal temperature with a probe thermometer. It should read 145 degrees. Remove from the oven.
8. Transfer the chops to a plate and tent loosely with foil. Let them rest for 5 minutes so the juices redistribute before serving.
Notes
Store in the refrigerator for up to 3 days or freezer for up to 2 months. Reheat at 350°F for 10 minutes.
Do not add extra salt to the seasoning rub, as the brine already salts the meat perfectly.
If your pork chops are thinner than one inch, skip the oven step and cook them entirely on the stovetop to prevent drying out.
- Prep Time: 13 min
- Rest Time: 5 min
- Cook Time: 17 min
- Category: Main Course
- Method: Baking, Stovetop
- Cuisine: American
Nutrition
- Serving Size: 1 pork chop
- Calories: 320 kcal
- Sugar: 4 g
- Sodium: 620 mg
- Fat: 18 g
- Saturated Fat: 5 g
- Unsaturated Fat: 11 g
- Trans Fat: 0 g
- Carbohydrates: 6 g
- Fiber: 0 g
- Protein: 32 g
- Cholesterol: 95 mg
Seasoning and Dredging for a Golden Crust
Once your chops are brined and thoroughly patted dry, the next step is building a seasoning rub that adds flavor without burning. A wet chop tossed straight into a smoking hot skillet will produce gray, boiled meat. We want a crust that crackles slightly when you bite into it. To get this crust on your juicy pork chops, you need a specific blend of dry spices and a secret ingredient: a light dusting of flour.
In a shallow dish, combine garlic powder, smoked paprika, black pepper, and a tablespoon of all-purpose flour. The garlic powder gives a savory, aromatic backbone that penetrates the meat during cooking. Smoked paprika gives you that beautiful reddish-gold color that makes the chops look professionally cooked. Black pepper adds a sharp, floral heat that cuts through the richness of the pork fat. Do not add additional salt to this rub. The brine has already perfectly seasoned the interior of the meat, and adding more salt now will draw moisture back out to the surface.
The flour is the real trick here. When you lightly coat the outside of the chops in flour, you create a barrier between the meat and the screaming hot oil. This thin layer absorbs the olive oil in the skillet, toasts rapidly, and forms a crisp shell that locks the brined moisture inside the pork. Without the flour, the proteins on the surface of the meat will bond tightly with the hot metal, tearing and leaving bits of precious meat stuck to the pan. I hate when that happens. If you enjoy a sweeter, stickier variation on this technique, you might try our garlic brown sugar pork chops for a completely different flavor profile that uses a similar crust-building method.
Coat both sides of the chops evenly with this dry mixture. Shake off any excess flour. You want a thin, even dusting, not a thick batter. The visual difference between a properly dredged chop and a naked one becomes obvious the second they hit the oil. The dredged chops immediately sizzle and release a toasted, nutty aroma. The naked chops will spit water and turn pale. Take these extra two minutes to build a proper seasoning crust. Your juicy pork chops get a textural contrast between the snap of the exterior and the soft, yielding interior.
The Sear and Oven Finish Method
Now we reach the actual cooking phase. The perfect texture requires a two-zone cooking method. You need the intense, direct heat of a stovetop burner for the crust, and the gentle, ambient heat of an oven to bring the center up to temperature. Preheat your oven to 400 degrees. Place a cast-iron skillet on the stovetop over medium-high heat and let it get thoroughly hot before adding your oil.
Add a tablespoon of olive oil to the pan. The oil should shimmer and ripple, but not smoke aggressively. Carefully lay the chops in the pan, laying them away from you to avoid splashing hot oil onto your skin. Let them sit completely undisturbed for three full minutes. Do not poke them, do not move them, and do not peek underneath. You are building a chemical reaction between the flour, the sugars, and the heat. After three minutes, use tongs to flip the chops. The underside should be a deep, rich mahogany brown. If it is still pale, let it cook for another minute before flipping.
Once both sides are beautifully seared, transfer the entire cast-iron skillet directly into your preheated oven. Finishing the chops in the oven prevents the exterior from burning while the center cooks. A thick bone-in chop needs the ambient heat of the oven to penetrate the dense meat without ruining the crust you just built. This same two-step technique works beautifully when making fried pork chops, though we use a deeper oil fry for that variation.
AT-A-GLANCE COMPARISON
To understand why this specific cast iron and oven method is worth the effort, compare it against the other ways people attempt to cook pork chops. Each method has distinct trade-offs in time, texture, and required attention.
| Method | Total Time | Texture Result | Effort Level | Best For |
|---|---|---|---|---|
| Cast Iron and Oven (This Recipe) | 35 min | Crisp crust, juicy interior | Moderate | Thick bone-in chops |
| Slow Cooker | 4-6 hours | Fall-apart soft, no crust | Low | Busy weekdays, thin chops |
| Pure Stovetop | 20 min | Good crust, high dry-out risk | High | Thin, quick-cooking chops |
The slow cooker method yields shredded, soft meat but completely sacrifices the golden crust. The pure stovetop method is fast but requires constant attention to avoid overcooking the center. The cast iron and oven finish gives you the best of both worlds.
Resting and Temperature Guidelines
The most critical step in making juicy pork chops happens after you turn off the heat. If you cut into the meat the second it leaves the oven, all those brined juices will pour out onto your cutting board, leaving the meat dry. You must let the meat rest. But before you rest the chops, you need to check the internal temperature to make sure the pork is safe without crossing the line into dry territory.
This is where many home cooks panic. Old USDA guidelines instructed people to cook pork to an internal temperature of 160 degrees. If you cook your chops to 160 degrees, they will be entirely white, grainy, and thoroughly dried out. The current USDA guideline states that pork is safe to eat at 145 degrees. At 145 degrees, the pork will have a slight blush of pink in the center, which is exactly what you want for tender, moist pork chops. The residual heat will continue to cook the meat slightly even after you take it out of the oven, a process known as carryover cooking.
Insert an instant-read thermometer into the thickest part of the chop, making sure the probe does not touch the bone. The bone conducts heat differently than the meat and will give you a falsely high reading. As soon as the thermometer hits 145 degrees, pull the skillet out of the oven. Transfer the chops to a clean cutting board or a plate. Tent a piece of foil loosely over the top to keep them warm without trapping steam that would ruin your crust.
Let the chops rest for exactly five minutes. During this time, the muscle fibers relax and the juices redistribute evenly throughout the meat. When you slice into the chop after resting, the juices stay inside the meat. You will notice a slight pink ring around the edge of the cut. That pink color comes from nitrates in the brine reacting with the heat. It is not blood. Slice into these perfectly juicy pork chops and you will immediately see the difference a proper rest makes. The meat will yield to the knife and glisten with natural moisture.
Serving Suggestions and Flavor Variations
Now that your juicy pork chops are perfectly cooked and rested, it is time to think about what goes on the plate. The savory, slightly smoky flavor of the paprika and garlic rub pairs well with both rich, comforting side dishes and bright, acidic vegetables. Build a balanced meal around the pork and the whole dinner comes together.
For a classic weeknight dinner, serve these chops over a bed of buttery mashed potatoes. The starchy potatoes act as a sponge, soaking up any extra juices that escape the meat when you cut it. If you want to double down on the brown sugar flavor from the brine, serve the chops alongside our garlic brown sugar carrots for a sweet and savory contrast. The earthy sweetness of the carrots balances the heavy, savory notes of the pork.
If you prefer something green, roasted green beans or a crisp side salad work wonders. The high heat of the oven means you can actually throw a sheet pan of vegetables on the lower rack while your chops finish cooking. A quick side of garlic brown sugar green beans takes on a charred, caramelized edge that mirrors the crust on the pork.
For a flavor variation on the main dish, you can change the spice blend in your dredging mixture. Swap the smoked paprika for chili powder if you want a Southwestern kick. Add a pinch of dried thyme or rosemary to the flour for an earthy, wintery flavor profile. You can even make a quick pan sauce after the chops rest. Place the skillet back on the stove over medium heat, add a splash of chicken broth, and scrape up the fond, which is the browned bits stuck to the bottom of the pan. Let the liquid reduce until it coats the back of a spoon, then spoon it over the chops. Once you master the base technique, you can play with the spices all year.
Frequently Asked Questions
What is the secret to moist pork chops?
The secret is a combination of a quick salt and sugar brine, a protective flour dredge, and cooking to exactly 145 degrees. Brining forces the meat to hold onto water, while the correct temperature prevents the proteins from seizing up and squeezing out all the moisture during cooking.
What is the best way to cook pork chops without them drying out?
The best way is to use a two-step method with a cast iron skillet and an oven. Sear the chops on the stovetop to build a crust, then move them to a 400 degree oven to finish cooking gently. Always let the meat rest for five minutes before slicing so the juices can redistribute.
What can I soak my pork chops in to make them tender?
Soak them in a quick brine of warm water, kosher salt, and brown sugar. The salt breaks down tough protein strands, while the sugar adds flavor and promotes caramelization. A 13 minute soak is plenty for thick, bone-in chops and prevents the meat from becoming overly salty or mushy.
What cuts of pork should I use to make this recipe?
You should use bone-in pork chops that are at least one inch thick. The bone adds flavor and helps insulate the meat, keeping it from overcooking. Avoid thin, boneless chops for this specific recipe because they will cook too quickly and dry out before the crust has time to form.
Can I use a different type of oil for searing?
Yes, you can use any high-smoke-point oil like canola, grapeseed, or avocado oil instead of olive oil. The goal is to have a fat that can withstand the high heat of the cast iron skillet without burning. Avoid butter for the searing step, as it will scorch at medium-high heat.
How do you keep pork chops from drying out?
Three things: buy chops at least 1 inch thick, pull them off the heat at 135°F (63°C) and let carryover cooking finish the job during a 5-minute rest, and if you have 30 minutes, a quick brine (1 tablespoon salt in 2 cups water) makes them nearly impossible to overcook.
How long do you fry pork chops in a skillet?
For 1-inch chops: 4–5 minutes on the first side and 3–4 on the second over medium-high heat, then a 5-minute rest. Thinner chops need barely 2–3 minutes per side — they are the easiest to overcook.
Conclusion
Making juicy pork chops comes down to respecting the science of the meat, not luck or expensive equipment. We started with the problem of dry, chewey pork, and now you have the exact tools to fix it. Trust the brine, trust the thermometer, and trust the rest. When you nail these three elements, you’ll never dread cooking pork again.
For more recipes like juicy pork chops, follow us on Facebook and Pinterest for weeknight dinner ideas.
More recipes in this series: