Most sourdough starter recipes get the first step wrong. They tell you to use tap water, which can kill the wild yeast before it even begins. Your starter isn’t weak; it’s being sabotaged.
This method fixes that. You’ll get a bubbly, active starter in about a week, without the confusing fails or wasted flour.
Here, you’ll find exact measurements, a clear feeding schedule, and smart ways to utilize the discard from day three onward.
Table of Contents
 16")
Table of Contents
What is a Sourdough Starter?
The Heart of Sourdough Baking
A sourdough starter is a live culture of wild yeast and beneficial bacteria. You create it by mixing flour and water and letting it ferment. The wild yeast originates from the air in your kitchen and the flour itself. This mixture bubbles and grows, becoming a natural leavening agent for bread.
This process is different from using commercial yeast. Commercial yeast is a single, fast-acting strain. A sourdough starter is a complex ecosystem. It gives bread a deeper flavor and a better texture. Once it’s active, you can use it to bake a classic sourdough bread recipe.
My first starter taught me patience. I named it “Bubbles,” and it took about a week to get strong. The key is consistent feeding with fresh flour and filtered water.
You only need two things to begin:
- Flour: Whole wheat or rye flour gives the wild yeast a great initial boost.
- Water: Filtered water, at about 75°F (24°C), creates the perfect environment.
The starter lives in a jar on your counter. You’ll feed it more flour and water daily. This refreshment keeps the culture active and hungry. Within a week, you should see lots of bubbles and smell a tangy, yogurt-like aroma. That’s your signal that fermentation is working.
Print 15")
How to Make a Sourdough Starter from Scratch (A Beginner’s Guide)
- Total Time: 168 hours 5 min
- Yield: 1 active starter (~200g) 1x
Description
This sourdough starter recipe uses just flour and water to capture wild yeast from your kitchen. You’ll feed it daily for about a week until it’s bubbly and active enough to leaven bread.
The process creates discard you can use in other recipes, so nothing goes to waste.
Ingredients
For the initial mix (Day 1):
50g whole wheat flour
50g all-purpose flour
100g filtered water (75°F / 24°C)
For daily feeding (Days 3-7):
50g all-purpose flour
50g filtered water (75°F / 24°C)
Optional:
Rye flour can replace whole wheat flour for the initial mix
Instructions
1. Day 1: In a clean glass jar, mix 50g whole wheat flour, 50g all-purpose flour, and 100g filtered water until no dry flour remains. Loosely cover and let sit at 70-78°F (21-26°C) for 24 hours.
2. Day 2: Observe for any bubbles or growth. Do not feed. Re-cover and let sit another 24 hours.
3. Day 3: Discard about half (100g) of the starter. To the remaining starter, add 50g all-purpose flour and 50g filtered water. Mix well, re-cover, and let sit 24 hours.
4. Days 4-7: Repeat the Day 3 process daily. Your starter is ready when it doubles in volume within 4-6 hours after feeding and passes the float test.
Notes
Store at room temperature for up to 1 day or in the fridge for up to 14 days (feed weekly). Freeze for up to 3 months.
Use a digital scale for accuracy, measuring by weight is more reliable than cups.
Place a rubber band around the jar after feeding to track the starter’s rise.
If your starter smells strongly acidic around day 3 or 4, keep feeding, this is normal.
Nutrition values are for the initial flour and water mix (approx. 200g total), not a per-serving amount.
- Prep Time: 5 min
- Rest Time: 168 hours
- Cook Time: 0 min
- Category: Baking, Sourdough
- Method: No-bake
- Cuisine: American
Nutrition
- Serving Size: 1 starter
- Calories: 362 kcal
- Sugar: 0 g
- Sodium: 0 mg
- Fat: 2 g
- Saturated Fat: 0 g
- Unsaturated Fat: 2 g
- Trans Fat: 0 g
- Carbohydrates: 76 g
- Fiber: 6 g
- Protein: 11 g
- Cholesterol: 0 mg
Why Make Your Own Starter?
Buying a dehydrated starter online is easy. Making your own is more rewarding. You capture the unique wild yeast from your own home. This means your starter, and the bread you bake with it, will have a flavor profile that’s truly yours.
A homemade starter is also incredibly versatile. Once it’s mature, it becomes the key to all kinds of sourdough recipes, from pancakes to crackers. You’re not just making an ingredient; you’re cultivating a kitchen companion. With basic maintenance, it can last for years. I’ve even given friends a portion of my starter as a gift.
This beginner sourdough starter recipe sets realistic expectations. The process isn’t hard, but it requires a little attention. You’ll have some discard, the portion you remove before feeding. Instead of throwing it away, you can use it in discard recipes from day three onward. This means no flour is wasted while you wait for your active starter to be ready.
The biggest benefit might be the bread. Sourdough made with a wild yeast starter is often easier to digest. The long fermentation helps break down the gluten and phytic acid in the flour. The result is a loaf with a crisp crust, an open crumb, and a complex, tangy flavor that packaged yeast can’t replicate.
What You Need to Make Sourdough Starter
Active Time: 5 minutes Total Time: 168 hours 5 minutes (about 1 week) Yield: 1 active starter (~200g)
Essential Ingredients
You only need two things to begin: flour and water. But the specific types you choose will make a big difference in how quickly your wild yeast gets going.
- Flour (100g total): I use a mix of 50g whole wheat flour and 50g all-purpose flour for the first few days. The whole wheat flour gives the wild yeast more nutrients to kickstart fermentation. After your starter is established, you can switch to feeding it with just bread flour or all-purpose flour.
- Filtered Water (100g): This is non-negotiable for me. Chlorine or chloramine in tap water can kill the microbes you’re trying to cultivate. Use room temperature filtered water, ideally around 75°F (24°C). Cold water slows fermentation; hot water can kill the yeast.
If you don’t have whole wheat flour, you can use rye flour for an even stronger initial boost. For a fun twist, you can experiment with a chocolate sourdough starter recipe later, but stick to basic flours for this first build.
Helpful Tools & Equipment
You probably have most of this in your kitchen already. Precision and cleanliness are your best friends here.
- Digital Kitchen Scale: This is the most important tool. Measuring by weight (grams) is far more accurate than using cups, which leads to consistent feeding and a happier starter.
- Glass Jar: You’ll need one 32-48 ounce (1-quart) jar with a wide mouth. A clear glass jar lets you watch the bubbles and growth without opening the lid. A Weck jar or a simple mason jar works perfectly.
- Rubber Band: This is your growth tracker. Put the band around the jar at the level of your starter right after feeding. As the starter rises with bubbles, you’ll see exactly how much it’s grown.
- Small Spatula or Spoon: For mixing. A mini silicone spatula gets into the corners of the jar easily.
A loose-fitting lid or a piece of cloth secured with a rubber band is better than a tight lid. It keeps bugs out but lets the carbon dioxide from fermentation escape, so your jar doesn’t explode.
A Few Tips Before We Begin
Setting up for success takes two minutes. These small steps prevent big headaches later.
First, find a consistent spot for your jar. A warm, draft-free corner of your kitchen counter is ideal. Consistent temperature is key; wild yeast works fastest between 70-78°F (21-26°C). If your kitchen is cooler, placing the jar in your oven with the light on (but the heat OFF) can create a perfect warm spot.
Second, use a permanent marker to label your jar with the date and feeding number (Day 1, Day 2, etc.). It sounds silly, but you will forget. This helps you stick to the schedule.
Finally, accept that you will have to discard. This is the portion you remove before each feeding to keep the jar from overflowing. Plan to use it! From day three onward, that discard can be used in pancakes, crackers, or even a simple sourdough sandwich bread recipe. Thinking of it as a free baking ingredient, not waste, makes this sourdough starter recipe feel much more efficient.
Step-by-Step: How to Make Sourdough Starter
This sourdough starter recipe is a daily ritual, not a single event. Follow these day-by-day steps and you’ll see your mixture transform into a bubbly, active starter.
Day 1: Mix The Starter
This is where your wild yeast journey begins. You’re creating the initial environment for fermentation.
- Grab your clean glass jar and place it on your digital kitchen scale. Tare the scale to zero.
- Add 50g of whole wheat flour and 50g of all-purpose flour to the jar.
- Pour in 100g of filtered water at about 75°F (24°C).
- Use a spatula to mix everything thoroughly until no dry flour remains. The consistency will be like thick pancake batter.
- Place a rubber band around the jar at the level of the mixture. Loosely cover the jar with its lid or a cloth.
- Let it sit in a warm spot (ideally 70-78°F / 21-26°C) for 24 hours.
Quick Note: Don’t expect bubbles today. You’re just hydrating the flour and inviting wild yeast from your kitchen air to move in.
Day 2: Look for Early Signs
You might see some activity, or you might not. Both are normal paths for a beginner sourdough starter.
- Look at your jar. You may see a few small bubbles on the surface or sides. The mixture might have expanded slightly, pushing past the rubber band.
- Smell it. It often smells a bit sweet, like yogurt or apples, at this early stage.
- There is no feeding or discarding today. Just observe, re-cover the jar, and let it sit another 24 hours.
If you see no bubbles at all, don’t worry. The wild yeast is just getting settled. A cooler kitchen temperature can slow this initial phase.
Days 3-7: The Daily Feeding Routine
Now the real work, and the discard process, begins. This daily refreshment feeds the good microbes and strengthens your culture.
- Each day, remove and discard about half of your starter (roughly 100g). This is your “discard.” Save it in a separate container in the fridge for recipes.
- To the remaining starter (about 100g) in the jar, add 50g of all-purpose flour and 50g of filtered water (75°F / 24°C). This is a 1:1:1 feeding ratio (equal parts existing starter, fresh flour, and water).
- Mix well, clean the jar sides, and reset your rubber band to the new level.
- Re-cover and let it rest for 24 hours before repeating.
Watch Out: Around days 3 or 4, your starter might smell strongly acidic or like vinegar and look inactive. This is normal! It means beneficial bacteria are colonizing first. Keep feeding daily; the wild yeast will catch up.
How to Know When Your Starter is Ready
An active starter is predictable and powerful. It should reliably rise and fall after each feeding.
- Visual Rise: After feeding, it should double in volume within 4-6 hours in a warm spot (78°F / 26°C). You’ll see a dome of bubbles on top and webbing throughout.
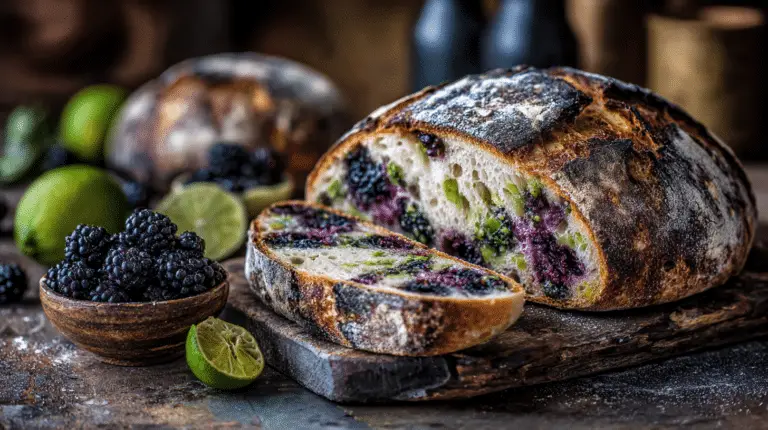
- The Float Test: This is my go-to check before baking. Drop a small spoonful of your active starter into a glass of room-temperature water. If it floats, it’s ready to leaven bread like our blackberry lime sourdough bread or raspberry lemon sourdough bread.
- Smell: It should have a pleasant, tangy aroma, like ripe fruit or yeast, not harsh or cheesy.
If it passes these tests consistently for two days, congratulations! Your homemade sourdough starter is mature. You can now use it for baking or move it to the fridge for weekly maintenance feeding.
Feeding, Storing & Using Your Sourdough Starter
How to Maintain & Feed an Active Starter
Once your starter is reliably passing the float test, you choose its home. For daily baking, keep it at room temperature. Feed it once a day using a 1:1:1 ratio: equal parts active starter, fresh flour, and water. Reset the rubber band to the new level after each feeding to track the rise. If you bake less often, the fridge is your friend. A cold starter goes dormant. Feed it, let it sit out for an hour, then refrigerate. Feed it once a week to keep it healthy.
For a fridge starter, take it out the night before you plan to bake. Give it a fresh feeding at room temperature so it’s vigorous and bubbly by morning. This refreshment step is non-negotiable for good oven spring.
Short-Term & Long-Term Storage Solutions
Your storage method depends on your baking schedule. Each option requires a different maintenance routine.
| Counter | Indefinite (feed every 12-24 hours) | Feed every 12-24 hours if kept at room temp |
| Fridge | Up to 14 days | Feed once weekly |
| Freezer | Up to 3 months | Feed, then freeze a portion in an airtight container |
For long-term backup, I spread a thin layer of active starter on parchment, let it dry completely, then crumble it into a jar. To revive, mix a tablespoon of the dried flakes with 50g of water and 50g of flour.
Creative Ways to Use Sourdough Discard
Discard is just unfed starter; it’s still packed with flavor and acidity. Don’t pour it down the drain. Store discard in a sealed container in the fridge and use it within two weeks.
It makes incredibly quick breads and pancakes because it doesn’t need to be active. My favorite uses are savory cheddar crackers or tangy waffles.
For something special, try incorporating it into a sweet loaf like blueberry orange sourdough bread.
Another great discard recipe is strawberry lemon sourdough bread. The discard adds a subtle complexity you can’t get with commercial yeast alone.
Troubleshooting Common Starter Problems
Most issues are simple fixes related to food, warmth, or time. Here’s a quick guide to the most common hiccups.
| No bubbles initially | Be patient. Keep discarding and feeding daily. Ensure your spot is warm (75-80°F / 24-27°C). |
| Liquid (hooch) forms on top | Your starter is hungry. Stir it in or pour it off and feed immediately. |
| Smells like acetone or strong vinegar | It’s starving. Feed it more frequently (every 12 hours) or use a higher ratio of fresh flour. |
| Isn’t doubling after feeding | Move it somewhere warmer. Try one feeding with whole wheat or rye flour for a boost. |
| Neglected in the fridge for weeks | Pour off any dark liquid. Take 1 teaspoon from the bottom, place in a clean jar, and feed normally to revive. |
If your starter ever looks pink or orange, that’s bad bacteria. Toss it and begin again, this beginner sourdough starter recipe is simple to restart
Your Sourdough Starter Recipe Questions, Answered
How do you make your own sourdough starter?
Mix 50g whole wheat flour and 50g all-purpose flour with 100g filtered water at 75°F (24°C) in a jar. Let it sit for 24 hours. For the next 5-7 days, discard half of it daily and feed the remainder with 50g flour and 50g water. Look for consistent bubbles and doubling.
What is the secret to a good sourdough starter?
The secret is a combination of filtered water, consistent feeding, and a warm environment. Chlorine in tap water can kill the wild yeast, so filtered water is essential. Keeping your starter in a warm spot (70-78°F / 21-26°C) and feeding it consistently with equal parts flour and water are also crucial for strong, active growth.
What is the 1:1:1 rule for sourdough starter?
It’s a simple feeding ratio: equal parts existing starter, fresh flour, and water. For example, if you keep 100g of starter in your jar, you add 100g of fresh flour and 100g of water. This refreshment keeps the culture balanced and prevents it from becoming too acidic.
How long does it take for a sourdough starter to be ready?
Typically, 7 days, but it depends on the temperature. In a warm kitchen (78°F / 26°C), it might be ready in 5-6 days. It’s ready when it reliably doubles within 4-6 hours after feeding and passes the float test. Cooler environments can extend this timeline by several days.
You only need flour, filtered water, and a jar. This sourdough starter recipe is simple to make at home because you’re just feeding a mixture daily. Watch for bubbles, do the float test, and you’ll have a living culture in about a week.
I always use a rubber band to mark my jar’s starting level. It’s the easiest way to track the rise. Give it a try this weekend, your future sourdough bread is waiting.
What’s the first thing you’ll bake once your starter is active?
For more recipes like the sourdough starter recipe, follow us on Facebook and Pinterest for more wild yeast projects and creative discard recipes.